VB Control Basics
The topics that have been presented up until now have followed the "Try It" format for sample programs. The "Try It" format was deliberately sparse and devoid of GUI elements, as the purpose of those topics was to build a foundation in the language itself – variables, basic I/O, built-in functions, control structures, Subs and Functions, file processing, arrays, etc. In other words, the previous topics have been "more BASIC than Visual".
Now that the language basics have been covered, the "Try It" format will be retired, and we will concentrate on the more GUI-oriented aspects of VB programming. The GUI aspects of VB programming involves the use of the various controls that are available in the toolbox (there are intrinsic controls, which appear in the toolbox as soon as you open a new VB project, as well as additional "ActiveX" controls that can be added in through the Project -> Components menu). With controls come properties (a set of variables that describe the appearance, behavior, and other aspects of the control), methods (procedures built into a control that tell the control how to do things), and events (actions that occur in your program). Properties, methods, and events common to most controls are described in the tables below.
Common Properties of Visual Basic Controls
Every object, such as a form or control, has a set of properties that describe it. Although this set isn't identical for all objects, some properties (such as those listed in the table below) are common to most controls. You can see every design-time property for a given control by looking at the Properties window in the IDE (some controls have properties that are available only at run-time – such as the SelStart and SelLength properties of the Textbox).
|
Property |
Description |
|
Appearance |
Specifies whether an object's border appears flat or with a 3D look. |
|
Align or Alignment |
For controls displaying text, specifies whether text is left, center, or right-aligned. For controls such as a PictureBox or ToolBar, specifies how the control itself is aligned on the form (top, bottom, left, or right). |
|
BackColor |
Specifies the background color of the control. |
|
BorderStyle |
Generally, specifies whether or not a control has a border. For the Form itself, the type of border can be specified. |
|
Caption or Text |
The string of text that is to be displayed in the control. |
|
Enabled |
Determines whether or not the control can respond to user-generated events. |
|
Font |
For controls displaying text, specifies the font (name, style, size, etc.) to be applied to the displayed text. |
|
ForeColor |
Specifies the color of text or graphics to be displayed in the control. |
|
Height |
Specifies the height of the control. The default unit is the twip, which is 1/1440 of an inch. |
|
Index |
Specifies the element number of a control if the control is a member of a control array. |
|
Left |
Specifies the distance between the internal left edge of a control and the left edge of its containter.The default unit is the twip, which is 1/1440 of an inch. |
|
Name |
The string value used to refer to the control in code. |
|
Picture |
Specifies the graphic to be displayed in the control. |
|
TabIndex |
Specifies the tab order of a control within its parent form, |
|
TabStop |
Specifies whether or not the user can use the Tab key to give focus to the control. |
|
Tag |
A string containing extra data associated with the control. |
|
ToolTipText |
Specifies text to be displayed when the mouse is paused over the control. |
|
Top |
Specifies the distance between the internal top edge of a control and the top edge of its containter.The default unit is the twip, which is 1/1440 of an inch. |
|
Visible |
Specifies whether the control is visible or hidden, |
|
Width |
Specifies the width of the control. The default unit is the twip, which is 1/1440 of an inch. |
Common Methods of Visual Basic Controls
Methods are blocks of code designed into a control that tell the control how to do things, such as move to another location on a form. Just as with properties, not all controls have the same methods, although some common methods do exist, as shown in the table below:
|
Method |
Description |
|
Move |
Changes an object's position in response to a code request |
|
Drag |
Handles the execution of a drag-and-drop operation by the user |
|
SetFocus |
Gives focus to the object specified in the method call |
|
ZOrder |
Determines the order in which multiple objects appear onscreen |
Common Events of Visual Basic Controls
Events are what happen in and around your program. For example, when a user clicks a button, many events occur: The mouse button is pressed, the CommandButton in your program is clicked, and then the mouse button is released. These three things correspond to the MouseDown event, the Click event, and the MouseUp event. During this process, the GotFocus event for the CommandButton and the LostFocus event for whichever object previously held the focus also occur.
Again, not all controls have the same events, but some events are shared by many controls. These events occur as a result of some specific user action, such as moving the mouse, pressing a key on the keyboard, or clicking a text box. These types of events are user-initiated events and are what you will write code for most often. Events common to most VB controls are described in the table below.
|
Event |
Occurs When ... |
|
Change |
The user modifies text in a combo box or text box. |
|
Click |
The user clicks the primary mouse button on an object. |
|
DblClick |
The user double-clicks the primary mouse button on an object. |
|
DragDrop |
The user drags an object to another location. |
|
DragOver |
The user drags an object over another control. |
|
GotFocus |
An object receives focus. |
|
KeyDown |
The user presses a keyboard key while an object has focus. |
|
KeyPress |
The user presses and releases a keyboard key while an object has focus. |
|
KeyUp |
The user releases a keyboard key while an object has focus. |
|
LostFocus |
An object loses focus. |
|
MouseDown |
The user presses any mouse button while the mouse pointer is over an object. |
|
MouseMove |
The user moves the mouse pointer over an object. |
|
MouseUp |
The user releases any mouse button while the mouse pointer is over an object. |
Command Buttons, Text Boxes, and Labels
Three of the most basic controls involved in building an interface are command buttons, text boxes, and labels.
Command Buttons
The command buttons was the only control that was used in the "Try It" examples. Command buttons are generally used to begin, interrupt, or end a particular process. A user will often use a command button either by clicking it or by tabbing to it and pressing Enter (either of these actions will cause the code behind the command button's Click event to be executed). Other ways of invoking the command button's Click event are (1) set up an "access key" for it (this is shown in the sample program below), (2) set its Default property to True (which allows the user to select that button by pressing Enter regardless of which control currently has the focus), and (3) set its Cancel property to True (which allows the user to select that button by pressing Esc regardless of which control currently has the focus).
Labels
A label control is used to display text that a user cannot edit directly. However, you can write code to change the text that is displayed by assigning a string value to the label's Caption property. Common uses of the label control are to display a message to the user and to identify another control (such as a textbox) that does not have its own Caption property.
Text Boxes
A textbox control (sometimes referred to as an edit field, edit box, or text entry control) is used to display information entered either by you at design time, by the user at run time, or by an assignment statement in the program code. The displayed text may be accessed by setting or reading the textbox's Text property.
Sample Program
Following is the step-by-step process to build a program that adds two numbers together. A simple task, yes, but one that illustrates several concepts related to the controls discussed above. The steps are as follows:
1. Start VB and select "Standard EXE" from the opening dialog. At this point, VB has started a new project for you and has provided you with one form.
2. Click on the form to make sure it is the active window, then click the Properties window. If the Properties window is not displayed on the screen, you can display it by doing one of the following three things: (1) press F4, (2) click the Properties button on the toolbar (the icon is a hand pointing to a piece of paper), or (3) click View, then Properties Window from the VB menu.
Set the following properties of the form:
Property Setting
(Name) frmAdd
Caption Add Program
3. Using the figure below as a guide, place the necessary controls from the toolbox onto the form. The three basic VB controls are the label, textbox, and command button; these are the controls we will be working with for this program.

Note on access keys:
An access key is a key combination that a user can press (usually the Alt key plus a letter) to invoke an action. Access keys provide a keyboard alternative to using the mouse to perform the same action. For example, most Windows programs that have a File menu will let you open that File menu either by using your mouse to click on the word "File" or by pressing the Alt+F key combination on your keyboard. The "F" in this case would be considered the access key.
You can create an access key on any control that has a Caption property (such as a label or a command button) by placing an ampersand (&) to the left of the desired letter in the caption. On the form, the letter shows up as underlined.
For a command button, pressing Alt + the underlined key is the same as clicking the button; it causes the button's "Click" event to fire (more on that shortly). On a label, provided that the TabIndexes are set properly, the access key causes focus to go to next control that can receive focus (the textbox). Note on "focus": When a control is "active" – meaning it is either waiting to receive input or is highlighted – that control is said to have the "focus".
Note on the TabIndex property
Most controls have a TabIndex property. Using the TabIndex property, you can control the sequence of controls that will receive the focus when the user navigates your form via the keyboard. As the user traverses your form by pressing the Tab key, controls will receive focus in the order specified by the TabIndexes. Note that in this sample project, I am calling for the TabIndexes of the nine controls to be in sequence from left to right, top to bottom (we start numbering the TabIndexes with 0, thus the TabIndexes of the controls range from 0 to 8).
Certain controls, such as labels, cannot receive focus. However, if you have a label control paired up with a textbox, and you set the TabIndex of the label control to a value one less the TabIndex of the textbox, then you can use an access key on the label's Caption property. When you do this, you set up a situation such that when the user uses the access key of the label, focus will move to the textbox whose TabIndex has a value one greater than the label's TabIndex.
Trick of the trade: Although VB lacks a way to automatically set TabIndexes for all controls in one fell swoop, there is a way to avoid having to enter the exact value of the TabIndex as you go through the controls top to bottom and left to right. What you can do is move from control to control starting right to left, bottom to top, setting the TabIndex to 0 (zero) on each control. As you do this, VB will automatically adjust the TabIndexes of each control. By the time you reach the top leftmost control, your control's TabIndexes will be nicely numbered from 0 to one less than the number of controls on your form.
Note on naming conventions for controls:
Note that the textbox names are prefixed with "txt", the label with "lbl", and the command buttons with "cmd". These follow the standard naming conventions for controls. For controls that will not be referred to in code (such as the three descriptive labels), its OK to leave them with the VB default names ("Label1", "Label2", etc.) – but for controls that will be referenced in code, it is highly recommended that they be renamed to conform to the naming conventions.
Following is a table listing some commonly used controls and their recommended prefixes:
|
Control type |
prefix |
Example |
|
Check box |
chk |
chkReadOnly |
|
Combo box |
cbo |
cboEnglish |
|
Command button |
cmd |
cmdExit |
|
Common dialog |
dlg |
dlgFileOpen |
|
Date picker |
dtp |
dtpPublished |
|
Directory list box |
dir |
dirSource |
|
Drive list box |
drv |
drvTarget |
|
File list box |
fil |
filSource |
|
Form |
frm |
frmEntry |
|
Frame |
fra |
fraLanguage |
|
Gauge |
gau |
gauStatus |
|
Graph |
gph |
gphRevenue |
|
Grids |
grd |
grdPrices |
|
Horizontal scroll bar |
hsb |
hsbVolume |
|
Image |
img |
imgIcon |
|
Image combo |
imc |
imcProduct |
|
ImageList |
iml |
imlAllIcons |
|
Label |
lbl |
lblHelpMessage |
|
Line |
lin |
linVertical |
|
List box |
lst |
lstPolicyCodes |
|
ListView |
lvw |
lvwHeadings |
|
Masked Edit |
msk |
mskPhoneNbr |
|
Menu |
mnu |
mnuFileOpen |
|
Month view |
mvw |
mvwPeriod |
|
MS Chart |
cht |
chtSalesbyRegion |
|
MS Tab |
tab |
tabFirst |
|
OLE container |
ole |
oleWorksheet |
|
Option button |
opt |
optGender |
|
Picture box |
pic |
picVGA |
|
Picture clip |
clp |
clpToolbar |
|
ProgressBar |
prg |
prgLoadFile |
|
RichTextBox |
rtb |
rtbReport |
|
Shape |
shp |
shpCircle |
|
Slider |
sld |
sldScale |
|
StatusBar |
sbr |
sbrDateTime |
|
SysInfo |
sys |
sysMonitor |
|
TabStrip |
tbs |
tbsOptions |
|
Text box |
txt |
txtLastName |
|
Timer |
tmr |
tmrAlarm |
|
Toolbar |
tbr |
tbrActions |
|
TreeView |
tvw |
tvwOrganization |
|
UpDown |
upd |
updDirection |
|
Vertical scroll bar |
vsb |
vsbRate |
4. Double-click the Add button. This causes the code window to open. Type the following code in the cmdAdd_Click routine:
Private Sub cmdAdd_Click()
Dim intNum1 As Integer
Dim intNum2 As Integer
Dim intSum As Integer
intNum1 = Val(txtNum1.Text)
intNum2 = Val(txtNum2.Text)
intSum = intNum1 + intNum2
lblSum.Caption = intSum
End Sub
In this code, a number of things should be pointed out. First, in the statements
intNum1 = Val(txtNum1.Text)
intNum2 = Val(txtNum2.Text)
the syntax txtNum1.Text and txtNum2.Text refer to the Text property of the textboxes txtNum1 and txtNum2 respectively. In general, to refer to a property of a control in code, use "dot" notation, in the format object.property.
The Text property of a textbox is considered to be a String data type. Whatever the user types into a textbox will be stored in its Text property. The Val function converts a string to a number. Basically, these statements are saying "convert the contents of the textboxes to numbers and store them in the Integer variables".
The statement
lblSum.Caption = intSum
does an implicit conversion of intSum from an Integer to a String data type; the string representation is stored in the Caption property of the lblSum label control (the label with the border). This assignment statement causes the sum to be displayed on the form in the lblSum control.
Using Default Properties
All controls have a default property, which means that if you omit the ".property" part when referring to a control in code, the default property will be used. The default property of a textbox is Text, and the default property of a label is Caption. Therefore, the statements
intNum1 = Val(txtNum1.Text)
intNum2 = Val(txtNum2.Text)
could have been written as
intNum1 = Val(txtNum1)
intNum2 = Val(txtNum2)
And the statement
lblSum.Caption = intSum
could have been written as
lblSum = intSum
In older versions of VB, it was slightly more efficient to omit the default property; although this is not much of an issue now. Some folks say that omitting the default property detracts from the clarity of the code, although I personally did not agree with that and would omit the default properties when coding. However, I've recently switched from omitting the default properties to explicitly coding them – one reason for this is that in the next version of VB (VB.NET), there will be major syntax changes, one of these is that there will no longer be default properties for objects.
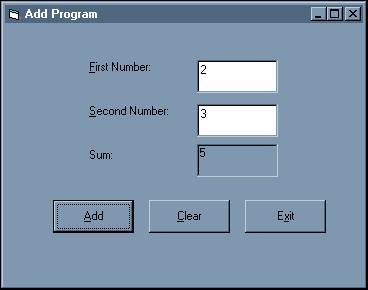
5. We're not done yet, but we can run the program to test the add function. To run the program, do one of the following three things: (1) click the Run button on the toolbar (looks like a sideways triangle), (2) press F5, or (3) select Run, then Start from the VB menu. The form should then become the active window. Type 2 for the first number and 3 for the second, then click the Add button. The result should be displayed in the designated label, as shown below:
You can go back and enter different numbers and click the Add button again. Also, test the access keys. Observe what happens when you press Alt+F, Alt+S, and Alt+A.
If you click the Clear or the Exit button, nothing will happen, because we did not yet write code to respond to the Click events for those buttons (we will fix this shortly).
6. Stop the program. This can be done by clicking the "X" button on the upper-right-hand corner of the form, by clicking the stop button on the VB toolbar (looks like a black square), or by selecting Run, then End from the VB menu. Once we finish coding, we will be able to stop the program by clicking the Exit button on our form.
7. We are now back in the "design-time" environment. Make sure you understand the difference between "design-time" and "run-time". Double-click the Clear button, and type the following code in the cmdClear_Click event procedure.
Private Sub cmdClear_Click()
txtNum1 = ""
txtNum2 = ""
lblSum = ""
txtNum1.SetFocus
End Sub
The first three statements in this procedure use the default properties of the textboxes and the sum label to clear the text out of their Text and Caption properties, respectively. This is done by assigning the "empty string" to them – the "empty string" ("") is simply two quotes next to each other with nothing in between.. Visually, the text in these controls will disappear when these assignment statements are made.
The last statement, txtNum1.SetFocus causes the cursor to be positioned on the txtNum1 textbox. "SetFocus" is a method of the textbox. Methods of objects generally perform some action on the object. SetFocus causes the control in question to be the "active" control. The general format for invoking a method on an object is object.method.
8. Double-click the Exit button to open the code window for the cmdExit_Click event. Simply type the word End after the procedure header:
Private Sub cmdExit_Click()
End
End Sub
9. Run the program again. The Clear and Exit buttons should now work. When you are done testing the program, exit it to return to the design-time environment.
At this point, the basic functionality of the program is complete, although there are a handful of enhancements that can be made. These enhancements are described below. As each enhancement is discussed, add it to your program and test it.
One enhancement is to highlight the text in a textbox when that textbox receives focus. To do this, code the GotFocus event for that textbox:
Private Sub txtNum1_GotFocus()
txtNum1.SelStart = 0
txtNum1.SelLength = Len(txtNum1.Text)
End Sub
The SelStart and SelLength properties are used to highlight all or partial text in a textbox. These properties are only available through code; they are not available the Properties window. The SelStart property specifies on which character position of the text the highlighting should begin (it is zero-based, so 0 means the first character). TheSelLength property specifies how many characters of the text should be highlighted. In the example, we are using the Len function on the text in the textbox to set the SelLength property to the total number of characters contained in the text. Thus, the two statements coded in this event have the effect of highlighting the current text in the textbox.
To "factor out" an object (like the "txtNum1" textbox) in a series of statements, you can use a With/End With block (results in more efficient code because VB does not have to repeatedly resolve the object reference when compiling/interpreting). The following code is equivalent to the above:
Private Sub txtNum1_GotFocus()
With txtNum1
.SelStart = 0
.SelLength = Len(.Text)
End With
End Sub
The GotFocus event for txtNum2 should be coded in the same manner:
Private Sub txtNum2_GotFocus()
With txtNum2
.SelStart = 0
.SelLength = Len(.Text)
End With
End Sub
A second enhancement would be to weed out non-numeric characters as the user types in the textbox. To do this, you would code a KeyPress event for that textbox, as shown below:
Private Sub txtNum1_KeyPress(KeyAscii As Integer)
If KeyAscii < 32 _
Or InStr("0123456789", Chr$(KeyAscii)) > 0 Then
' OK - do nothing
Else
KeyAscii = 0
End If
End Sub
In the code above, the first thing to note is that VB automatically passes an integer parameter called KeyAscii to the KeyPress event. This integer contains the ASCII code corresponding to the key that the user pressed. The logic first tests to see if the ASCII key code is less than 32 – if it is, that's OK because ASCII characters 31 and below are "control" keys, such as the backspace and arrow keys, and we don't want to restrict the user from entering those keys. The logic also uses the InStr function to see if the character equivalent of the ASCII code is contained within the set of numeric digits – if it is, that's OK, we want the user to enter only digits. If either of those tests fail, we reset the KeyAscii variable to 0, which has the effect of nullifying the user's keystroke – for example, if the user typed the letter "A", it would appear to them that that key is "dead" – it would not appear in the textbox.
The KeyPress event for txtNum2 should be coded in the same manner:
Private Sub txtNum2_KeyPress(KeyAscii As Integer)
If KeyAscii < 32 _
Or InStr("0123456789", Chr$(KeyAscii)) > 0 Then
' OK - do nothing
Else
KeyAscii = 0
End If
End Sub
If you want to limit the number of digits the user types into a textbox, you can set the MaxLength property of the textbox. By default, the MaxLength property of a textbox is 0, meaning there is no limit to how many characters the user can type. Set the MaxLength property of txtNum1 and txtNum2 each to 4.
The final enhancement discussed here is the implementation of an "auto-tab" feature. This is a feature where, when the user types in the maximum number of characters in a control, they are automatically tabbed to the next available control. Textboxes do not have an auto-tab property, but one can be implemented by setting the MaxLength property and then coding the Change event for that textbox. For example, you code the Change event for txtNum1 and txtNum2 as follows:
Private Sub txtNum1_Change()
With txtNum1
If Len(.Text) = .MaxLength Then
txtNum2.SetFocus
End If
End With
End Sub
Private Sub txtNum2_Change()
With txtNum2
If Len(.Text) = .MaxLength Then
cmdAdd.SetFocus
End If
End With
End Sub
Download the VB project code for the example above here.
The subsequent topics in this chapter are a series of programming exercises, where you can combine the language basics you have learned in the previous chapters along with the GUI concepts presented in this topic to solve some simple and some not-so-simple programming tasks.