Menus
This tutorial demonstrates how to build menus in VB programs.
EXAMPLE 1
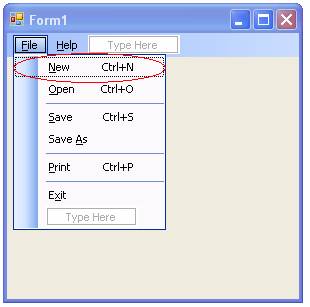
The end result of Example 1 will be a form containing a menu with two top-level items, File and Help.
The File menu, shown below, will have the following level-two items below it: New, Open, Save, Save As, Print, and Exit. Note that separator bars appear above the Save, Print, and Exit items.
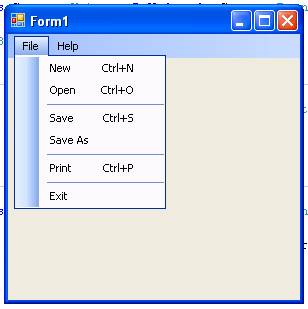
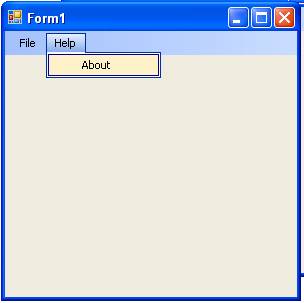
The Help menu contains just one level-two item below it, About.
|
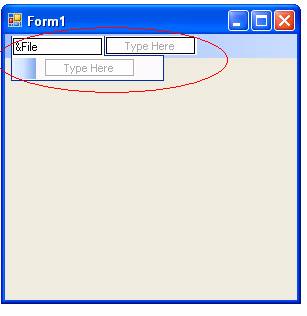
To build a menu for use with your VB program, go to the “Menus & Toolbars” section of the toolbox and double-click the MenuStrip control. It will then appear in the component tray below the form, as well as along the top of the form, where you can begin to build the visual interface for the menu (the first top-level item of the menu will be open with the words “Type Here”). |
|
||||||||||||||||||
|
In the first menu item, type &File (by placing the ampersand to the left of the "F", we establish "F" as an access key for the File item – it enables the user to drop down the File menu by keying "Alt+F" on the keyboard in addition to clicking the "File" item with the mouse). As you type, the visual interface will open up an item below the top-level item (indicating the opportunity to populate the drop-down menu items that will be associated with the top-level items); and it will open up another top-level item to the right of the first one (indicating the opportunity to populate another top-level item). It is up to you to decide in which direction to proceed.
|
|
||||||||||||||||||
|
In this case, we will move down first to populate the drop-down items for “File”. Here, we have items for “&New”, “&Open”, “&Save”, “Save &As”, “&Print”, and “E&xit”. |
|
||||||||||||||||||
|
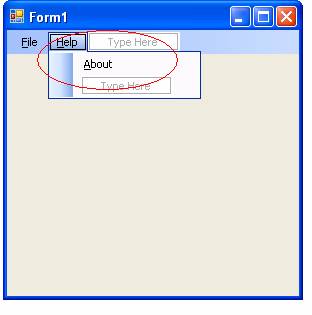
Next, we move across and create another top-level item labeled “&Help”, with one drop-down item below it, labeled “&About”. |
|
||||||||||||||||||
|
At this point, we have laid out the menu structure, but we still have some more work to do in setting up these menu items: we want to give the menu items proper names, set up shortcut keys, and insert separator bars where desired. These tasks can be accomplished by setting the appropriate properties in the Items Collection Editor.
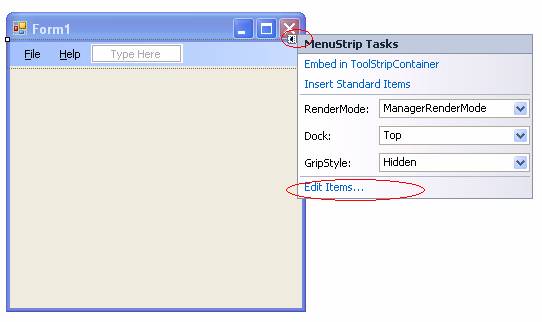
To bring up the Items Collection Editor, first, make sure the menu strip is selected. Then, bring up the "MenuStrip Tasks" menu by clicking the little arrow on the upper right-hand side of the menu strip. Then click "Edit Items...". |
|
||||||||||||||||||
|
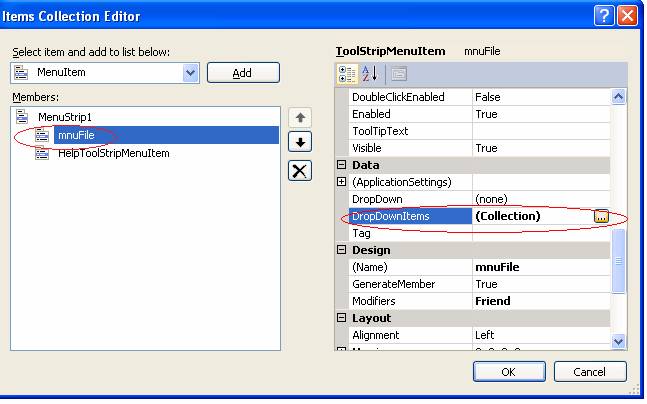
In the Items Collection Editor, note that in the "Members" listbox on the left, the two top level menu items were given the names "FileToolStripMenuItem" and "HelpToolStripMenuItem". Select "FileToolStripMenuItem" and then in the window on the right, locate the "(Name)" propery and change the name to "mnuFile". |
|
||||||||||||||||||
|
Once you move off of the "(Name)" property, the name change will show in the Members listbox. We now want to edit the drop-down items associated with the top-level File item, so navigate to the "DropDownItems" property and click the ellipsis ("...") button. |
|
||||||||||||||||||
|
A second "Items Collection Editor" window now appears, enabling you to edit the drop-down items associated with the top-level mnuFile item. Note that, in the Members list, the default names for the drop-down items ("NewToolStripMenuItem", "OpenToolStripMenuItem", etc.) are given. We are now going to rename each item; and for some of the items we will set a shortcut key. In the screen shot on the right, we are renaming the "New" item to "mnuFileNew". |
|
||||||||||||||||||
|
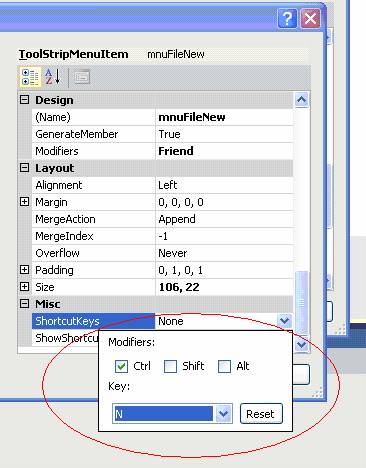
We are now going to set a shortcut key for the"New" item. Navigate to the "ShortcutKeys" property ... |
|
||||||||||||||||||
|
Clicking the drop-down arrow on the ShortcutKeys property brings up the interface you see in the screen shot on the right. Here, we want to set the shortcut key for the "New" item to Ctrl-N. |
|
||||||||||||||||||
|
Continuing on this path, name the remaining File menu drop-items and set their shortcut keys as follows:
|
|
||||||||||||||||||
|
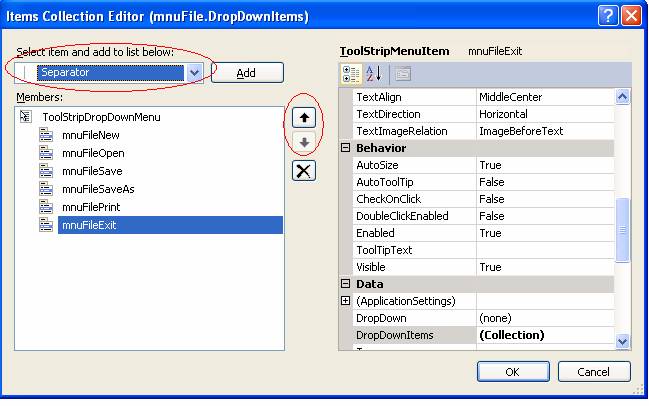
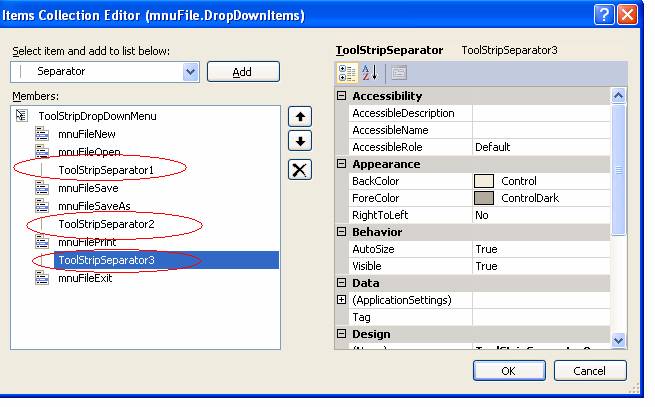
Next, we want insert separator items in-between some of these items. To do so, select "Separator" from the drop-down box labelled "Select item and add to list below", and click the "Add" button. This will add the separator item to the bottom of the list. You can then move the separator to the desired location using the up and down arrow buttons. |
|
||||||||||||||||||
|
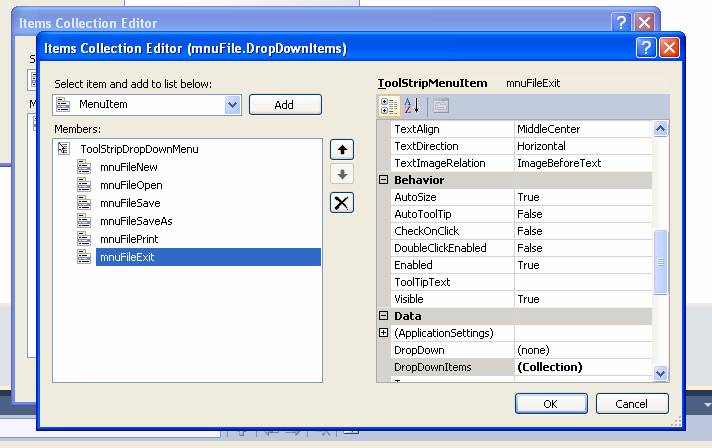
Here, we have inserted separators between the Open and Save items, between the SaveAs and Print items, and between the Print and Exit items.
Having completed the property entries for the File drop-down items, click OK to dismiss this dialog. |
|
||||||||||||||||||
|
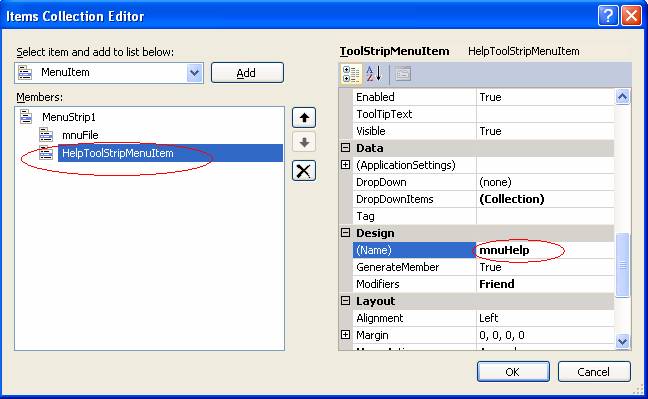
We are now returned to the Items Collection Editor for the top-level menu items. Select the Help menu item (which was given the name “HelpToolStripMenuItem” by default) and rename it “mnuHelp”. |
|
||||||||||||||||||
|
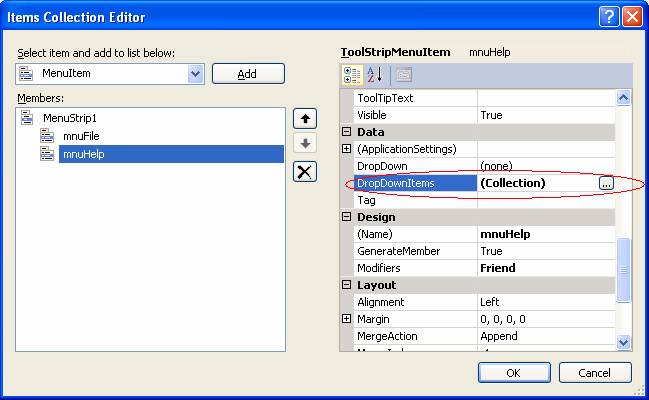
Navigate to the “DropDownItems” property for mnuHelp. |
|
||||||||||||||||||
|
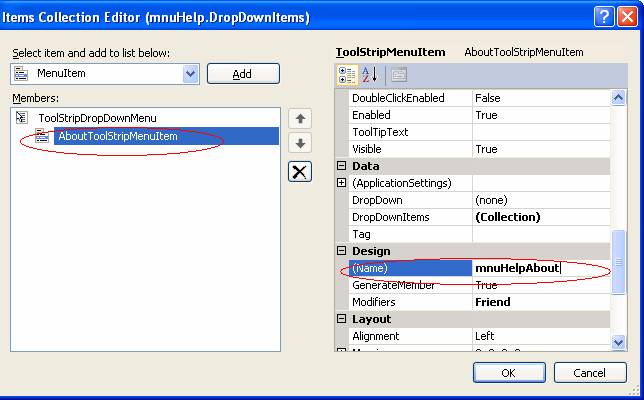
Clicking on the ellipsis button for the DropDownItems brings up the Item Collection Editor for the mnuHelp drop-down items. Select the “AboutToolStripMenuItem” from the Members listbox, then select the (Name) property and rename this item “mnuHelpAbout”. No shortcut key need be set for this item.
Click OK to dismiss this dialog, then click OK to dismiss the Items Collection Editor for the top-level items. |
|
||||||||||||||||||
|
We are now back to the main form, and ready to write code for the menu items. Click on the “File” item to show its drop-down items, then double-click on “New”. |
|
||||||||||||||||||
|
The code window will open with a stub for the mnuFileNew_Click event. Here, you would place the code you want to execute when the user clicks the New menu item. Since this is just a demo, we will place a simple MsgBox statement in the event procedure:
|
Private Sub mnuFileNew_Click(ByVal sender As System.Object, ByVal e As System.EventArgs) Handles mnuFileNew.Click
MsgBox("Code for 'New' goes here.", MsgBoxStyle.Information, "Menu Demo")
End Sub
|
||||||||||||||||||
|
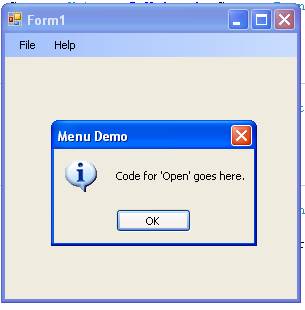
Code similar MsgBox statements for the Open, Save, Save As, and Print menu items:
|
Private Sub mnuFileOpen_Click(ByVal sender As System.Object, ByVal e As System.EventArgs) Handles mnuFileOpen.Click
MsgBox("Code for 'Open' goes here.", MsgBoxStyle.Information, "Menu Demo")
End Sub
Private Sub mnuFileSave_Click(ByVal sender As System.Object, ByVal e As System.EventArgs) Handles mnuFileSave.Click
MsgBox("Code for 'Save' goes here.", MsgBoxStyle.Information, "Menu Demo")
End Sub
Private Sub mnuFileSaveAs_Click(ByVal sender As System.Object, ByVal e As System.EventArgs) Handles mnuFileSaveAs.Click
MsgBox("Code for 'Save As' goes here.", MsgBoxStyle.Information, "Menu Demo")
End Sub
Private Sub mnuFilePrint_Click(ByVal sender As System.Object, ByVal e As System.EventArgs) Handles mnuFilePrint.Click
MsgBox("Code for 'Print' goes here.", MsgBoxStyle.Information, "Menu Demo")
End Sub
|
||||||||||||||||||
|
For the Exit menu item Click event, code the statement Me.Close.
|
Private Sub mnuFileExit_Click(ByVal sender As System.Object, ByVal e As System.EventArgs) Handles mnuFileExit.Click
Me.Close()
End Sub
|
||||||||||||||||||
|
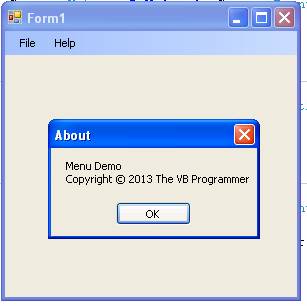
For the About menu item Click event, code as shown:
|
Private Sub mnuHelpAbout_Click(ByVal sender As System.Object, ByVal e As System.EventArgs) _ Handles mnuHelpAbout.Click
MsgBox("Menu Demo" & ControlChars.NewLine & _ "Copyright " & Chr(169) & " " & Year(Date.Today) & " The VB Programmer", _ MsgBoxStyle.OkOnly, _ "About")
End Sub
|
||||||||||||||||||
|
Run the program. Note how the code executes when you click on the various menu items. Also test the use of the access keys (e.g., Alt+F, N) and shortcut keys (e.g., Ctrl-O).
|
|


Download the project files for this sample application here.
EXAMPLE 2
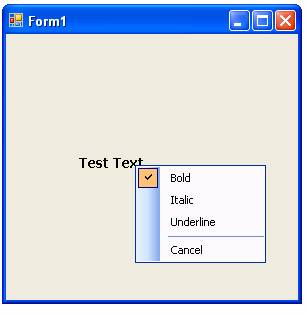
This example shows you how to create a context menu (sometimes called a pop-up menu or a right-click menu).
The end result will be a program that lets you format a label with Bold, Italic, and/or Underline font styles. The choices for the font styles will appear in context menu when you right-click on the label. This example also introduces the Checked property of the menu item.
To build this program, follow the steps below:
|
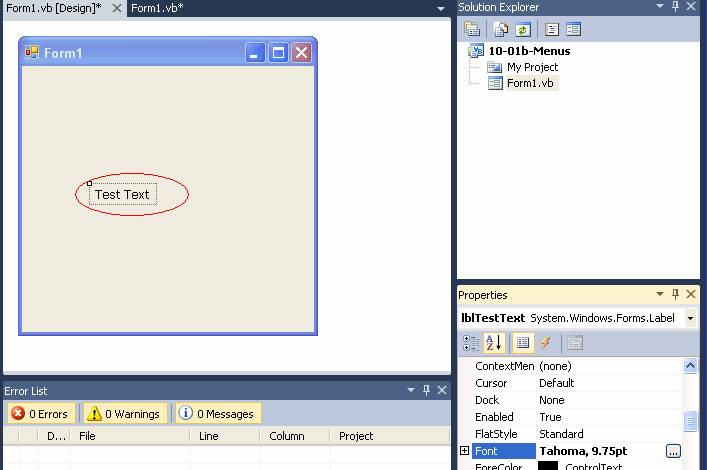
Start a new VB project and place a label on the form. Name the label lblTestText. Set the Text property to Test Text. Set the font to Tahoma 10 pt.
|
|
|
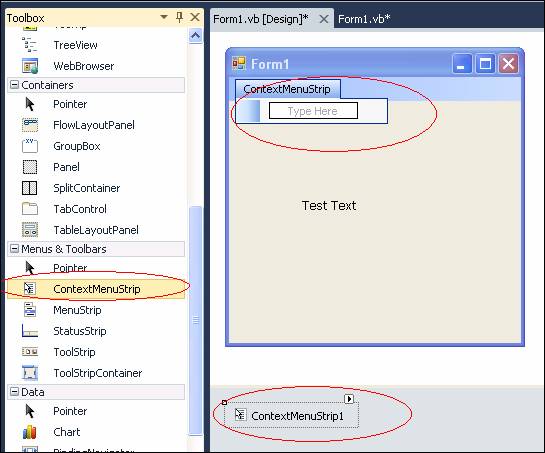
To build a context menu for use with your VB program, go to the “Menus & Toolbars” section of the toolbox and double-click the ContextMenuStrip control. As with the MenuStrip control from the first example, the ContextMenuStrip will then appear in the component tray below the form, as well as along the top of the form, where you can begin to build the visual interface for the menu (the first item of the menu will be open with the words “Type Here”). The difference is that that a context menu will not show automatically when you run the program – you will have to explicitly show it, normally in response to a right-click of the mouse. |
|
|
Create items for Bold, Italic, Underline, and Cancel as shown. Then, select the ContextMenuStrip control in the gray component tray and click on the smart tag to bring up the “ContextMenuStrip Tasks” menu, and select “Edit Items”, |
|
|
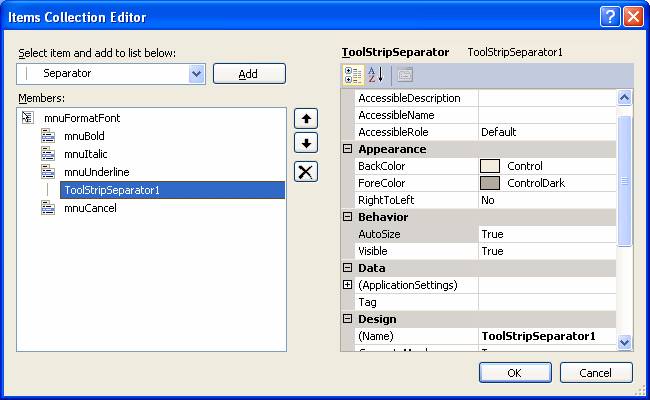
In the Item Collection Editor, rename the context menu itself “mnuFormatFont”, and rename the Bold, Italic, Underline, and Cancel menu items as shown, and insert a separator item above the Cancel item.
Click OK to dismiss this dialog when done. |
|
|
Now we are ready to code. The idea is to pop up the context menu when the user right-clicks on the label. The menu will present the font formatting options that the user can choose.
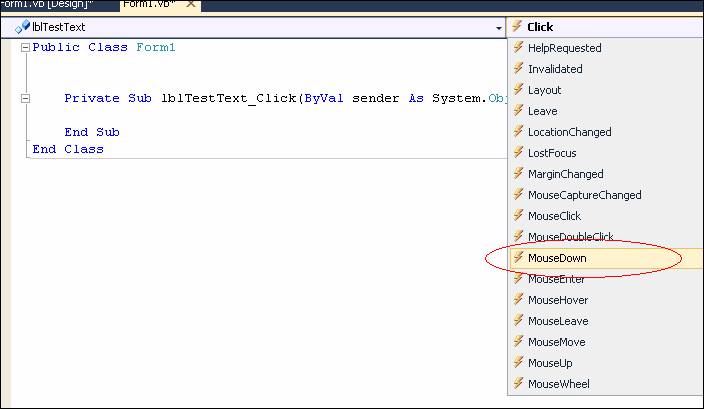
Double-click on the “Test Text” label. This will bring up the code window, with the default Click event stub code. However, we don’t want to respond to Click, we want to respond to the MouseDown event. So in the event drop-down list for the label control (located at the top right of the code window), select the MouseDown event as shown. |
|
|
The code stub for the MouseDown event will appear. Place the code to show the context menu as shown in the screen shot on the right. Note that the e.Button argument is tested for Windows.Forms.MouseButtons.Right – as is conventional, we only want to pop up the menu if the user right-clicks on the label. If the user clicks the right mouse button, the Show method of the context menu is executed. It is this statement that makes the pop-up menu appear.
|
Private Sub lblTestText_MouseDown(ByVal sender As Object, ByVal e As System.Windows.Forms.MouseEventArgs) _ Handles lblTestText.MouseDown
If e.Button = Windows.Forms.MouseButtons.Right Then mnuFormatFont.Show(lblTestText, e.Location) End If
End Sub
|
|
Before we add code for the menu items, we need to create a “helper” routine that will apply the font styles that the user selects. This routine is a Sub called “SetLabelFont”, shown in the screen shot on the right. It initializes a FontStyle object with a “regular” style. Then, in a series of If statements, it checks to see which menu items (Bold, Italic, and Underline) are checked. If a particular style is checked, a logical “Or” operator is used to add that style to the FontStyle object. Once the desired styles have been applied, the Font property of the label is set to a Font object that incorporates our newly created FontStyle. |
Private Sub SetLabelFont()
Dim objFontStyle As System.Drawing.FontStyle = System.Drawing.FontStyle.Regular
If mnuBold.Checked Then objFontStyle = objFontStyle Or System.Drawing.FontStyle.Bold End If
If mnuItalic.Checked Then objFontStyle = objFontStyle Or System.Drawing.FontStyle.Italic End If
If mnuUnderline.Checked Then objFontStyle = objFontStyle Or System.Drawing.FontStyle.Underline End If
lblTestText.Font = New Font("Tahoma", 10, objFontStyle, GraphicsUnit.Point)
End Sub
|
|
The code for the Click events of the Bold, Italic, and Underline menu items is shown in the screen shot on the right. Note that the Checked property of the menu item is used. When set to True, this causes a checkmark to appear to the left of the menu item. The Checked property is typically used as a toggle. So basically what these events do is toggle the checkmark of the clicked item, and then calls the SetLabelFont helper routine to apply the change.
|
Private Sub mnuBold_Click(ByVal sender As System.Object, ByVal e As System.EventArgs) Handles mnuBold.Click
mnuBold.Checked = Not mnuBold.Checked SetLabelFont()
End Sub
Private Sub mnuItalic_Click(ByVal sender As System.Object, ByVal e As System.EventArgs) Handles mnuItalic.Click
mnuItalic.Checked = Not mnuItalic.Checked SetLabelFont()
End Sub
Private Sub mnuUnderline_Click(ByVal sender As System.Object, ByVal e As System.EventArgs) Handles mnuUnderline.Click
mnuUnderline.Checked = Not mnuUnderline.Checked SetLabelFont()
End Sub
|
|
That completes the coding. Run the program and check out the various options you have coded.
|
|

Download the project files for this sample application here.