File System Controls
(DriveListBox, DirListBox, FileListBox)
VB provides three native toolbox controls for working with the file system: the DriveListBox, DirListBox, and FileListBox. You can use these controls independently, or in concert with one another to navigate the file system.
The DriveListBox control is a specialized drop-down list that displays a list of all the valid drives on the user's system. The most important property of the DriveListBox is the Drive property, which is set when the user selects an entry from the drop-down list or when you assign a drive string (such as "C:") to the Drive property in code. You can also read the Drive property to see which drive has been selected.
To make a DirListBox display the directories of the currently selected drive, you would set the Path property of the DirListBox control to the Drive property of the DriveListBox control in the Change event of the DriveListBox, as in the following statement:
Dir1.Path = Drive1.Drive
The DirListBox control displays a hierarchical list of the user's disk directories and subdirectories and automatically reacts to mouse clicks to allow the user to navigate among them. To synchronize the path selected in the DirListBox with a FileListBox, assign the Path property of the DirListBox to the Path property of the FileListBox in the Change event of the DirListBox, as in the following statement:
File1.Path = Dir1.Path
The FileListBox control lists files in the directory specified by its Path property. You can display all the files in the current directory, or you can use the Pattern property to show only certain types of files.
Similar to the standard ListBox and ComboBox controls, you can reference the List, ListCount, and ListIndex properties to access items in a DriveListBox, DirListBox, or FileListBox control. In addition, the FileListBox has a MultiSelect property which may be set to allow multiple file selection.
Sample Program Overview
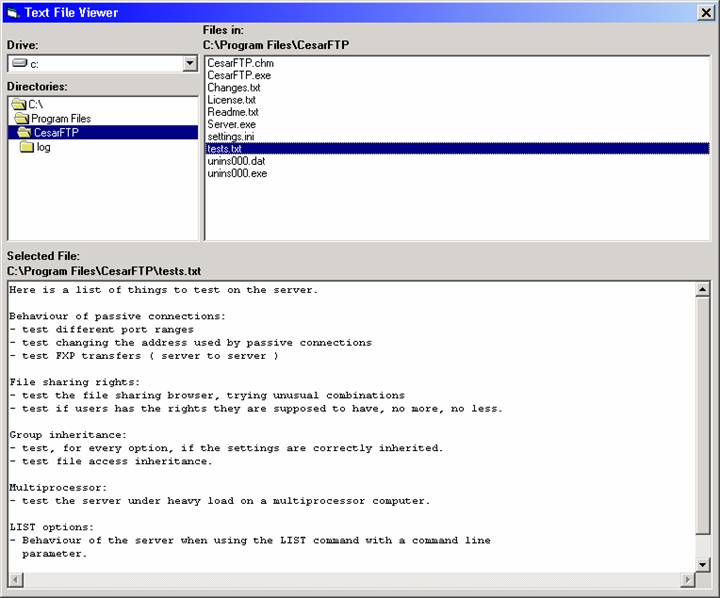
The sample program is a "Text File Viewer". The sample program uses the DriveListBox, DirListBox, and FileListBox to allow the user to navigate his or her file system. When the user selects a file that the program deems to be a "plain text" file, and that file is not "too large", the contents of that file is displayed in a multi-line, scrollable textbox.
In the screen-shot below, the user has navigated to the directory "C:\Program Files\CesarFTP" and selected the file "tests.txt" from that directory. The content of "tests.txt" is displayed in the multi-line textbox:
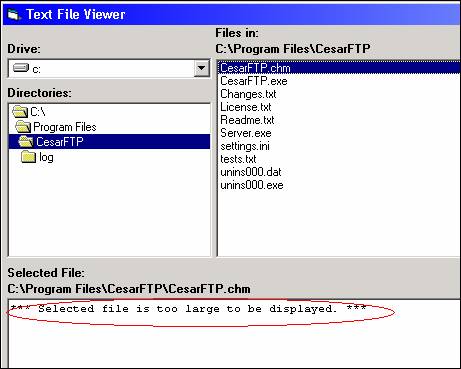
The multi-line textbox is limited in capacity to 64 Kbytes (655365 bytes). If the length of the selected file exceeds that amount, the program will not display the selected file; rather, it will display the message "*** Selected file is too large to be displayed. ***" in the textbox:
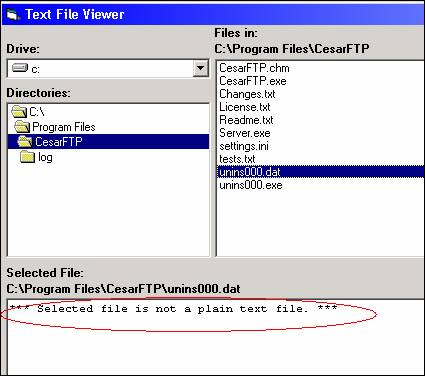
As mentioned above, the program will only display the contents of what it deems to be "plain text" files. To make the determination, the program scans the bytes of the selected file. If the file contains the ASCII characters 0 through 8, 11 through 12, or 14 through 31, the program will determine that this is NOT a plain text file (this is the standard that is used by the the W3C to validate XML files). If the selected file contains one of these characters, the program will not display the selected file; rather, it will display the message "*** Selected file is not a plain text file. ***" in the textbox:
Sample Program Design
The names and property settings for each control on the form, as well as for the form itself, were set as indicated in the callouts in the screen-shot below:
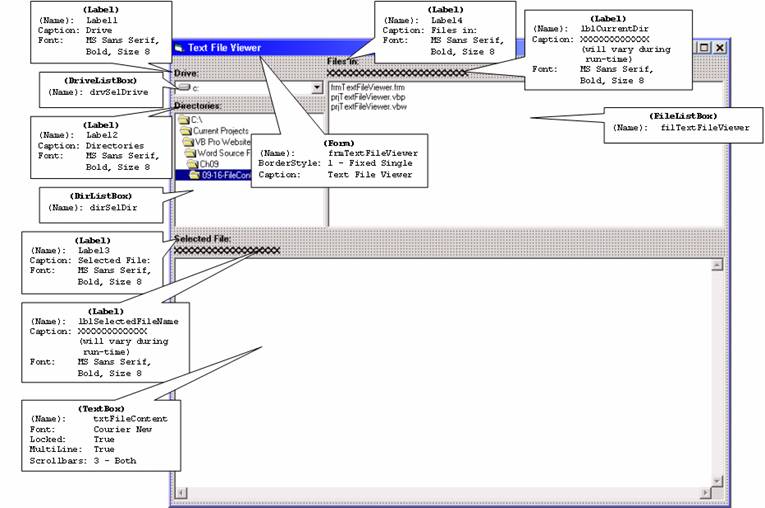
Note that we are using a multi-line textbox here. To tell VB that it is multi-line, we set the MultiLine property to True. In doing so, the setting for the ScrollBars property will be honored, and we set that to 3 – Both (meaning we will get both a Vertical and Horizontal scroll bar on the textbox, as needed). We also set the Locked property to True. This prevents the user from entering data into the textbox, but still allows them to scroll. The Font was set to Courier New, which is a mono-spaced font, more suitable for displaying plain-text files than the default MS Sans Serif font, which is a proportional font.
Sample Program Code
The heavily-commented code for the sample program is shown below.
Option Explicit
' Form-level variable to indicate last valid drive selected ...
Private mstrDrive As String
'-----------------------------------------------------------------------------
Private Sub Form_Load()
'-----------------------------------------------------------------------------
' Initialize the DriveListBox to point to the C: drive ...
drvSelDrive.Drive = "C:"
' Likewise for the "mstrDrive" variable ...
mstrDrive = "C:"
' Set the path of the DirListBox to point to the root of C:
dirSelDir.Path = "C:\"
End Sub
'-----------------------------------------------------------------------------
Private Sub drvSelDrive_Change()
'-----------------------------------------------------------------------------
' An error would occur if you attempted to change to a CD or floppy drive
' where the media was not ready ...
On Error Resume Next
' When the drive changes, set the Path of the DirListBox to point to the
' the newly selected drive ...
dirSelDir.Path = drvSelDrive.Drive
If Err.Number <> 0 Then
' There was a problem with the drive - most likely a CD or floppy drive was
' selected, but there was no CD or disk in the drive.
' Inform the user ...
MsgBox "Drive selected is unavailable.", vbInformation, "Drive Unavailable"
' Reset the Drive property of the DriveListBox to the last valid drive ...
drvSelDrive.Drive = mstrDrive
Else
' Drive change was OK, update the "mstrDrive" variable with the newly
' selected drive ...
mstrDrive = drvSelDrive.Drive
End If
End Sub
'-----------------------------------------------------------------------------
Private Sub dirSelDir_Change()
'-----------------------------------------------------------------------------
' The path of the DirListBox has changed, so set the path of the FileListBox
' to point to the new path of the DirListBox. This action alone will cause the
' contents FileListBox to refresh.
filTextFileViewer.Path = dirSelDir.Path
' Update the label caption to reflect the new directory path ...
lblCurrentDir.Caption = dirSelDir.Path
' Test the ListCount property of the FileListBox to see if there are any files
' in the current path ...
If filTextFileViewer.ListCount > 0 Then
' There is at least one file in the current path, so highlight (select) the
' first file by setting ListIndex to 0. This will invoke the filTextFileViewer_Click
' event ...
filTextFileViewer.ListIndex = 0
Else
' There are no files in the current path ...
lblSelectedFileName.Caption = "(None)"
txtFileContent.Text = ""
End If
End Sub
'-----------------------------------------------------------------------------
Private Sub dirSelDir_Click()
'-----------------------------------------------------------------------------
' Coding the Click event for the DirListBox with the code below will force
' the dirSelDir_Change event (by setting the Path property to the List property
' of the currently clicked item). Without doing this, the change event would
' only occur when user DOUBLE-CLICKS a new directory in the DirListBox.
' Invoking the Change on a single-click seems more natural.
' Note: Unlike other list controls, the List property of the DirListBox holds
' not just the text that is displayed in the control, but also the text of its
' of parent paths. For example, if the currently selected entry in a DirListBox
' was a directory called "CesarFTP" below the "Program Files" directory below the
' "C:" drive, the contents of that selected List entry would be
' "C:\Program Files\CesarFTP" - NOT JUST "CesarFTP".
With dirSelDir
.Path = .List(.ListIndex)
End With
End Sub
'-----------------------------------------------------------------------------
Private Sub filTextFileViewer_Click()
'-----------------------------------------------------------------------------
Dim strFileExt As String
Dim strCurrFile As String
Dim strFileContent As String
Dim intFreeFile As Integer
Dim lngFileLen As Long
Dim lngX As Long
Dim blnIsTextFile As Boolean
' If no files are selected from the FileListBox (ListIndex = -1),
' then get out because there's nothing to do ...
If filTextFileViewer.ListIndex = -1 Then Exit Sub
' Form a fully-qualified file name by concatenating the Path property
' of the FileListBox with the text of the currently selected entry (which
' is the filename). If the path already has a backslash at the end of it
' (as it would for a root directory), fine, otherwise add a backslash to the
' end of it before concatenating it with the filename ...
With filTextFileViewer
strCurrFile = IIf(Right$(.Path, 1) = "\", .Path, .Path & "\") _
& .List(.ListIndex)
End With
' Update the label caption to reflect the new filename ...
lblSelectedFileName.Caption = strCurrFile
' Use the FileLen function to get the length of the current file ...
lngFileLen = FileLen(strCurrFile)
' Test the file length ...
If lngFileLen >= 65536 Then
' Too big for the textbox, so just display the message ...
txtFileContent.Text = "*** Selected file is too large to be displayed. ***"
Else
' Read the entire contents of the file into a string variable ("strFileContent") ...
intFreeFile = FreeFile
Open strCurrFile For Binary Access Read As #intFreeFile
strFileContent = Input(LOF(intFreeFile), intFreeFile)
Close #intFreeFile
' Loop thru the file content byte-by-byte to test for characters that would
' "disqualify" the file from being regarded as a "plain-text" file. For our
' purposes, the ASCII characters 0 thru 8, 11 thru 12, and 14 thru 31 would
' disqualify the file.
blnIsTextFile = True
For lngX = 1 To lngFileLen
Select Case Asc(Mid$(strFileContent, lngX, 1))
Case 0 To 8, 11 To 12, 14 To 31
blnIsTextFile = False
Exit For
End Select
Next
' Done with the loop, so test the result ...
If blnIsTextFile Then
' All characters were valid, so assign the contents of the file to the
' Text property of the textbox ...
txtFileContent.Text = strFileContent
Else
' We encountered a disqualifying character, so dispaly a message rather
' than the contents of the file ...
txtFileContent.Text = "*** Selected file is not a plain text file. ***"
End If
End If
End Sub
Download the VB project code for the example above here.