Introduction to SQL (Structured Query Language)
Prerequisites
This tutorial presumes that the reader has a working knowledge of basic database table design principles, including basic normalization and relationships (one-to-many, one-to-one, many-to-many). Once a database has been designed and its tables have been populated with data, SQL can be used to manipulate the data in those tables.
Tutorials on database normalization and relationships can be found on various Internet sites. Even without this background, you may be able to glean some of this knowledge by going through the exercises in this tutorial.
You will need to have MS-Access 2000 (or higher) installed on your system to perform the examples presented in this tutorial. For one of the examples, you will also need MS-Excel.
About this Tutorial
The sample database used for this tutorial is a modified version of the sample "Northwind Traders" database, provided by Microsoft in Visual Studio and MS-Office.
The original database provided by Microsoft ("NWIND.MDB") contains many features that would detract from the purpose of this tutorial (in that the purpose of this tutorial is teach you how to write SQL to interact with database tables). The original database "shows off" many features of an MS-Access database: it contains many forms and reports; it also manipulates how some of the data appears when you open a table to view its contents (for example, a column may actually contain a numeric code, but the table datasheet view is set up to show the description corresponding to that code; also, in many cases a "display name" was set up for the column – for example, a column might actually be called "CustName" but it would appear as "Customer Name" when you opened the table).
The modified version of the database (called "NWINDVBP.MDB") has stripped out all of the "extras" so that it contains only the tables, and when you open a given table, you will see the true contents of the columns in that table.
Download the "NWINDVBP.MDB" database here.
A Note on Terminology
In this tutorial, the term record will be used interchangeably with the term row; and the term field will be used interchangeably with the term column.
Introduction to SQL
SQL (Structured Query Language) is a language designed to work with relational databases. Most people pronounce it "sequel", although others insist it must be pronounced "ess cue ell". I believe either pronunciation is fine.
In the mid 1970s, SQL was developed under the name SEQUEL (for Structured English Query Language?) at the IBM San Jose research facilities to be the data manipulation language for IBM's prototype relational model DBMS called "System R". In 1980, the language was renamed SQL to avoid confusion with an unrelated hardware product called SEQUEL.
SQL is currently used (and has been for quite some time) as the data manipulation language for most relational database management products on the market today. This includes IBM's DB2, Oracle, XBase (dBase, FoxPro, etc.), MS SQL Server, and Access. Although there are various SQL "standards" (SQL-89, SQL-92, etc.), there are variations in the "dialects" of SQL "spoken" by the different vendors. For example, there are some things you can do in Oracle SQL that you can't do with Access, and vice-versa.
On its own, SQL is a "non-procedural" language, meaning a program is not typically written in "straight SQL". When used on its own, a SQL command is given at a command-line interface provided by the DBMS software. You can then view the results of the single SQL command. Some DBMS's support SQL scripts (also called "stored procedures"), which is a file containing multiple SQL statements that are executed one after the other. SQL statements can also be embedded in a "host" language (like VB, C, COBOL, etc.), where a SQL statement can be executed and have its results processed by the host language.
SQL accomplishes many powerful tasks with a mere seven statements: SELECT, UPDATE, INSERT, DELETE, CREATE, ALTER, and DROP. Each of these seven statements fall into one of two categories: DML (Data Manipulation Language) statements or DDL (Data Definition Language) statements. These statements are summarized as follows:
DML Statements
SELECT Enables you to select one or more columns from one or more tables in the database. The results can be simply viewed, or can be used as the basis for a form or report, or, in the case of embedded SQL, can be processed as a temporary table (called a "recordset" in Access, called a "cursor" in other DBMSs).
UPDATE Enables you to update the data in one or more columns of one or more rows in a table.
INSERT Enables you to append rows to an existing table.
DELETE Enables you to delete one or more rows from an existing table.
DDL Statements
CREATE Enables you to create a new table, or to create a new index on an existing table.
ALTER Enables you to modify the structure of an existing table (by adding or deleting columns).
DROP Enables you to delete a table
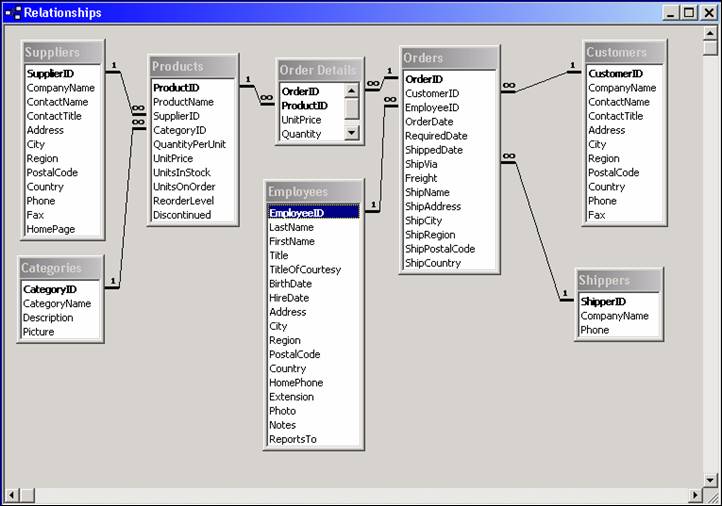
The Northwind Traders Database
This tutorial uses the database for Northwind Traders, a fictional company that is a distributor of specialty food items. The link to download the database file, NWINDVBP.MDB, is provided above.
The Northwind Traders database consists of eight tables, as shown below (to view this in Access, go to Tools à Relationships):
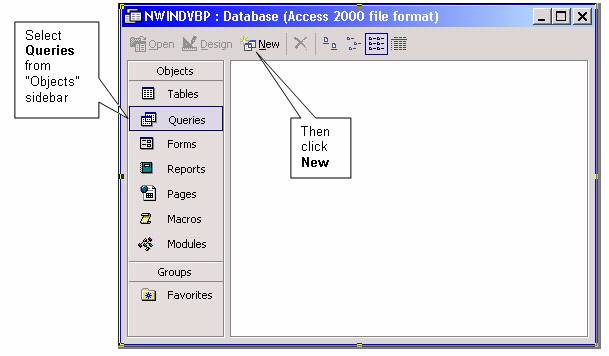
How to do Command-line SQL in Access
· Open the database that you want to work with (in this case, NWINDVBP.MDB).
· Select Queries from the Objects sidebar, then click New:
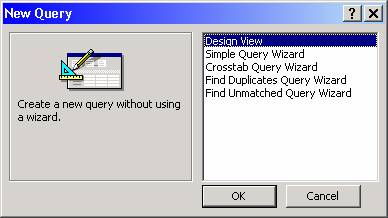
· The New Query dialog box appears (with "Design View" pre-selected as the default). Click OK:
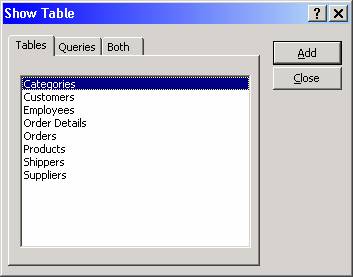
· The Show Table dialog box appears (note: your list of table names will not initially contain all of the table names shown here). Click Close:
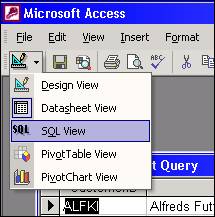
· The leftmost button on the Access toolbar should say "SQL". Click that button:
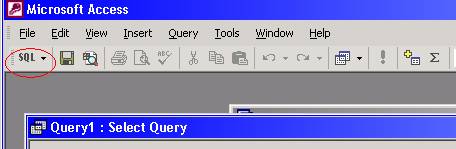
· A text-entry box will appear (with the word "SELECT" pre-entered and highlighted). This is where you type your SQL query:

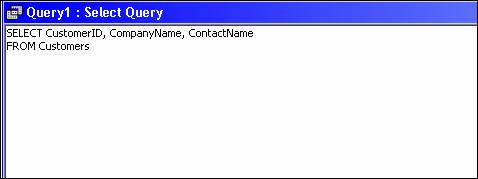
· Try one now. Type the following in the text-entry box:
SELECT CustomerID, CompanyName, ContactName
FROM Customers
Note: SQL is NOT case-sensitive. You can enter keywords, table names, and field names in either upper- or lower-case letters (or a combination of the two). The only time case-sensitivity is an issue is when you are dealing with quoted strings.
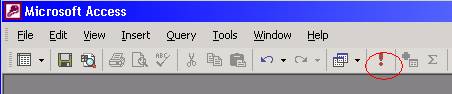
· To run the query, click the Run button on the toolbar (it's the "exclamation point" icon):
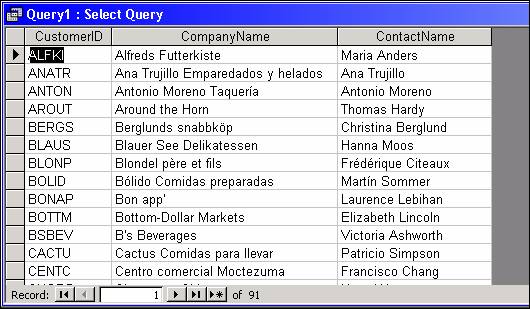
· Access then displays the results of the query in a datasheet view:
· To return to SQL view, select that option from the drop-down list of the leftmost toolbar icon:
Once you have returned to SQL view, you can overwrite the SQL command that you entered with the next SQL query you wish to enter. Before you overwrite the existing query, you can save it, as explained below.
· FYI: To see the graphical representation of the SQL query that you entered, select the "Design View" option :
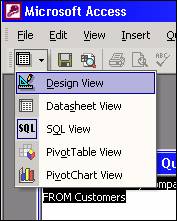
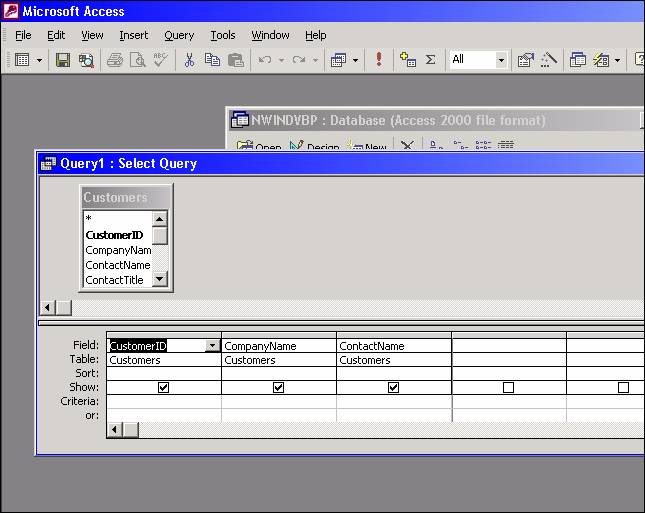
Whenever you write a query in SQL, Access builds the graphical representation of that query (if possible) behind the scenes (certain types of SQL queries cannot be represented graphically). Conversely, whenever you build a query graphically, Access generates the equivalent SQL statement behind the scenes.
Saving Queries
To save a query in the Access database, click the Save button (the diskette icon) on the Access toolbar. This will enable you to recall the query from the Queries tab in Access.
If you wish to only save the SQL statement (but not save the query in Access), you can select the text you entered in SQL view, copy it, then paste it into another application (such as Notepad, Word, or the VB code editor). Conversely, you can type up a SQL query in Notepad or Word, copy it, then paste it into the SQL View text-entry screen.
When you are at the point where you are writing a VB application that requires embedded SQL statements, you can use the graphical query capabilities of Access to "cheat". For example, if you can't recall exactly how to phrase a particular SQL statement, you can build a test query in Access with the graphical designer and run it. If it produces the desired results, you can switch over to SQL View and "steal" the code (i.e., copy it from Access and paste into VB). However – there is no substitute for simply "knowing" how to get the job done – and you may need to work with a DBMS that does not have a graphical designer for queries.
For each example in the following tutorial, please key in and run the SQL commands as shown. The SQL commands to key in will be shown in bold Courier, like the following:
SELECT CustomerID, CompanyName, ContactName
FROM Customers
The expected results of each query will also be shown, so that you can compare them to your results.
Part I: Single-Table Queries
The Basic SELECT Query
The SELECT query retrieves one or more columns (fields) from a table. The basic syntax is:
SELECT field1 [, field2, ... fieldn] FROM tablename
Notes: If more than one field is specified, each field must be separated with a comma. If you want to select ALL fields from a table, you can use an asterisk (*) instead of a list of all the fields.
Example 1:
Retrieve all columns and all rows from the Employees table.
SELECT * FROM EMPLOPYEES
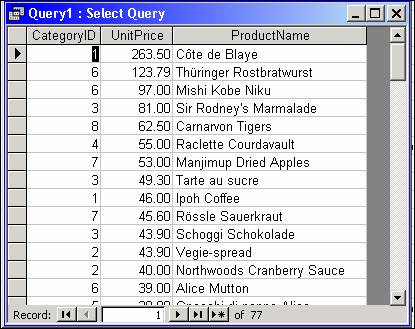
Example 2:
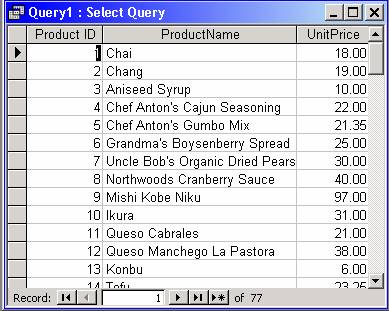
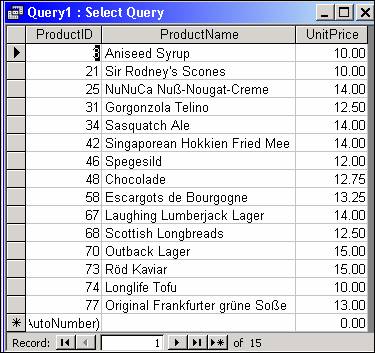
Retrieve the Product ID, product name, and unit price from all rows of the Products table:
SELECT ProductID, ProductName, UnitPrice
FROM Products
Note: SQL statements can be entered on multiple lines, as in the query above. A recommended practice is to start each clause of the SQL statement on a separate line. This is a style consideration only; it has no effect on the interpretation of the statement.
Adding a WHERE Clause
By adding an appropriate WHERE clause to a SELECT statement, you can limit the number of rows (records) returned by the query. The WHERE clause specifies a condition that must be met in order for that row be returned.
Note: In the WHERE clause,
numeric literals have no delimiters, string literals are delimited by single
quotes (') (although Access will also accept double quotes(")), and date
delimiters are delimited by the number sign (#). Delimiting dates with the
number sign is specific to Access; most other DBMS' use the single quote as the
date delimiter.
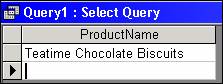
Example 3:
What is the name for product ID 19?
SELECT ProductName
FROM Products
WHERE ProductID = 19
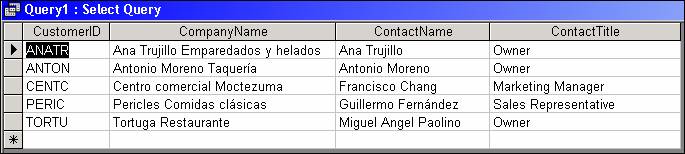
Example 4:
Which customers are from Mexico? (Show Customer ID, company name, contact name, and contact title in the results.)
SELECT CustomerID, CompanyName, ContactName, ContactTitle
FROM Customers
WHERE Country = 'Mexico'
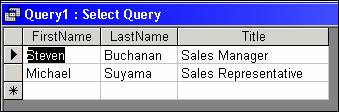
Example 5:
Which employees were hired on October 17, 1993? (Show employee first and last name, and title in the results.)
SELECT FirstName, LastName, Title
FROM Employees
WHERE HireDate = #10/17/1993#
Compound Conditions (Using AND and OR)
Example 6:
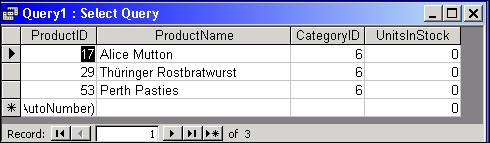
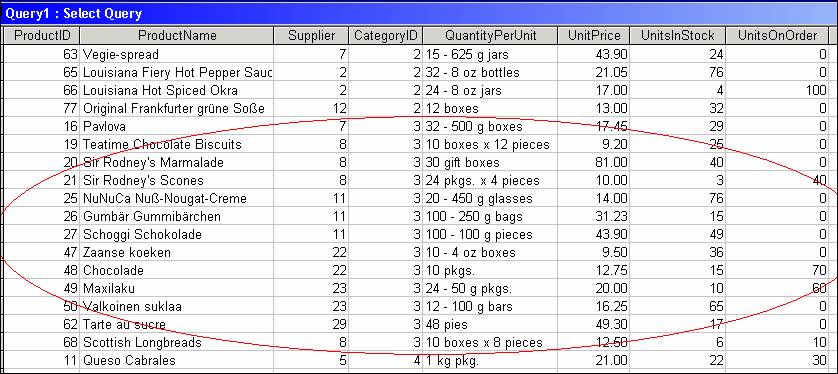
Which meat/poultry products (CategoryID = 6) have less than 10 units in stock? (Show product ID, product name, category ID, and units in stock in the results.)
SELECT ProductID, ProductName, CategoryID, UnitsInStock
FROM Products
WHERE CategoryID = 6 AND UnitsInStock < 10
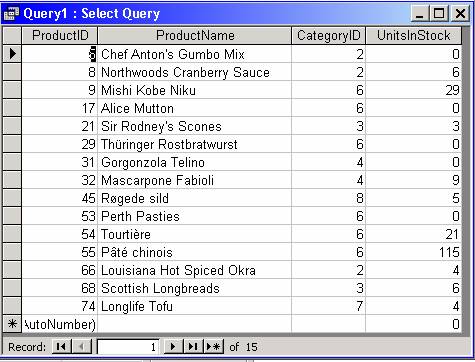
Example 7:
Which items in the Product table are classified as meat/poultry or have less than 10 units in stock? (Show product ID, product name, category ID, and units in stock in the results.)
SELECT ProductID, ProductName, CategoryID, UnitsInStock
FROM Products
WHERE CategoryID = 6 OR UnitsInStock < 10
You can join multiple conditions using AND and OR. When both AND and OR are used in the WHERE clause, "AND" takes precedence. This precedence can be overridden by using parentheses. Examples 8 and 9 illustrate this:
Example 8:
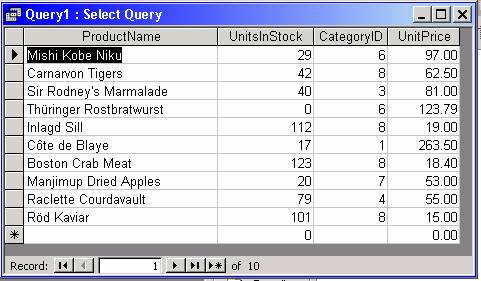
Show the product name, units in stock, category ID, and unit price for seafood products (category ID = 8) that have at least 100 units in stock, or for any item whose unit price is greater than $50.
SELECT ProductName, UnitsInStock, CategoryID, UnitPrice
FROM Products
WHERE UnitsInStock >= 100
AND CategoryID = 8
OR UnitPrice > 50
Example 9:
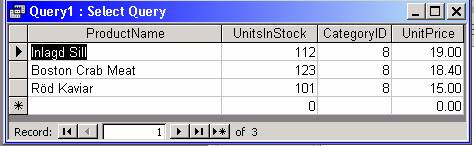
Show the part product name, units in stock, category ID, and unit price for products that have at least 100 units in stock, and that are either classified as seafood (category ID = 8) or have a unit price greater than $50.
SELECT ProductName, UnitsInStock, CategoryID, UnitPrice
FROM Products
WHERE UnitsInStock >= 100
AND (CategoryID = 8
OR UnitPrice > 50)
Using NOT
Example 10:
Show the company name, contact name, and country for all non-US suppliers.
SELECT CompanyName, ContactName, Country
FROM Suppliers
WHERE NOT (Country = 'USA')

Note: This query could also be coded as:
SELECT CompanyName, ContactName, Country
FROM Suppliers
WHERE Country <> 'USA'
Some DBMS' use "!=" for "not equal to" in addition to or instead of "<>".
Using BETWEEN / AND
Example 11:
Show the Product ID, product name, and unit price for all products that have a unit price between $10 and $15 (inclusive):
SELECT ProductID, ProductName, UnitPrice
FROM Products
WHERE UnitPrice BETWEEN 10 AND 15
Note: This query could also be coded as:
SELECT ProductID, ProductName, UnitPrice
FROM Products
WHERE UnitPrice >= 10 AND UnitPrice <= 15
Example 12:
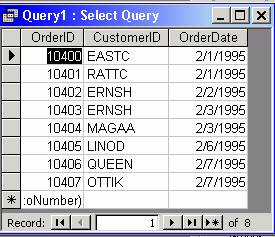
Show the Order ID, Customer ID, and order date for orders that occurred between February 1 and February 7, 1995.
SELECT OrderID, CustomerID, OrderDate
FROM Orders
WHERE OrderDate BETWEEN #2/1/1995# AND #2/7/1995#
Reminder: In Access SQL, Date literals must be delimited by pound signs (#). In most other database systems, dates are delimited with single quotes (same as strings).
Also: Queries based on dates become slighltly more involved if the dates have a time component to them (the dates in this database do not have a time component, but they could, because Date/Time fields can store both date and time together). If the OrderDate field contained a time component, you would have to write the WHERE clause of the above query like this:
WHERE OrderDate BETWEEN #2/1/1995# AND #2/7/1995 11:59:59PM#
- or -
WHERE OrderDate >= #2/1/1995# AND OrderDate < #2/8/1995#
Using Computed Columns (Expressions)
In the list of fields to be selected, you can specify an expression (arithmetic or string) that consists of a combination of fields and/or literals. In Access SQL, an expression can also incorporate a VB function such as DateAdd, Format$, Left$, etc. (although such expressions would not be accepted in non-Access environments, such as Oracle or SQL Server – however, those other DBMS environments have their own vendor-specific functions that can be used in expressions).
Example 13:
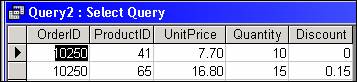
Show the OrderID, ProductID, UnitPrice, Quantity, Discount, and line item total for order line items that total at least $300.
SELECT OrderID, ProductID, UnitPrice, Quantity, Discount, Format$(UnitPrice * Quantity * (1 + Discount), "Fixed")
FROM [Order Details]
WHERE (UnitPrice * Quantity * (1 + Discount)) >= 300
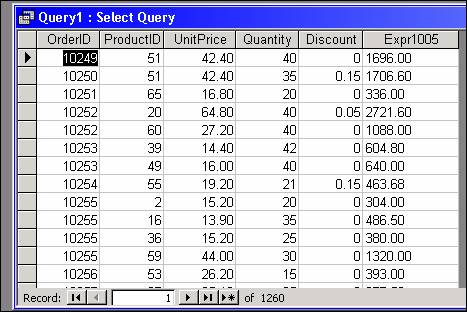
Note that Access generates a default name for computed columns in the form Expr####. You can override this default name by using an alias for the column name via the AS clause (see the next example).
Note also that the table "Order Details" has an embedded space in its name. Although this is not good practice, Access will allow it for all of its objects (tables, columns, queries, etc.). When an object name contains embedded spaces (and other odd characters), you must enclose it square brackets as was done in the example above.
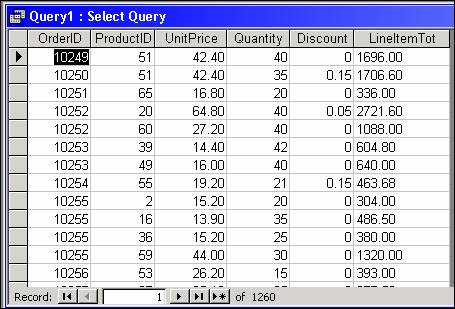
Example 14:
Repeat Example 13, except call the computed column "LineItemTot".
SELECT OrderID, ProductID, UnitPrice, Quantity, Discount,
Format$(UnitPrice * Quantity * (1 + Discount), "Fixed") AS LineItemTot
FROM [Order Details]
WHERE (UnitPrice * Quantity * (1 + Discount)) >= 300
Note: Some database systems do not require the word AS to specify an alias (in those systems, the expression is separated from the alias name with just a blank space).
Using LIKE
A WHERE clause condition can use the pattern-matching capabilities of the LIKE operator. In Access SQL, the syntax for LIKE is identical the VB syntax. In other database systems, the syntax for LIKE may vary (for example, Oracle uses a percent sign (%) instead of an asterisk (*) for a wildcard character).
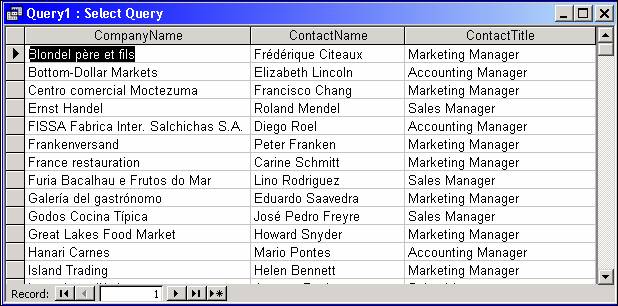
Example 15:
Show company name, contact name, and title for customers whose contact person is considered a "manager".
SELECT CompanyName, ContactName, ContactTitle
FROM Customers
WHERE ContactTitle LIKE '*Manager*'
Using IN
The IN operator can be used in a WHERE clause condition to specify that a field must be equal to any of several values.
Example 16:
Show company name and address information for all suppliers located in France, Germany, and Italy.
SELECT CompanyName, Address, City, Country, PostalCode
FROM Suppliers
WHERE Country IN ('France', 'Germany', 'Italy')

Note: This query could also be coded as:
SELECT CompanyName, Address, City, Country, PostalCode
FROM Suppliers
WHERE Country = 'France'
OR Country = 'Germany'
OR Country = 'Italy'
(As you can see, using IN in this case is much more concise.)
Sorting with the ORDER BY clause
You can sort the results of your query on any field or fields by using an ORDER BY clause.
Example 17-a:
Show the category ID, unit price, and product name for all products, sorted by unit price (low to high).
SELECT CategoryID, UnitPrice, ProductName
FROM Products
ORDER BY UnitPrice

Note: By default, ORDER BY sorts the data in ascending (low to high) sequence. You can specify an ascending or descending sort by using the keywords ASC or DESC, respectively. The last line of the above query could have been written:
ORDER BY UnitPrice ASC
Example 17-b:
Show the category ID, unit price, and product name for all products, sorted by unit price (high to low).
SELECT CategoryID, UnitPrice, ProductName
FROM Products
ORDER BY UnitPrice DESC
Example 18:
Show the category ID, unit price, and product name for all products, sorted by unit price (high to low) WITHIN category ID.
SELECT CategoryID, UnitPrice, ProductName
FROM Products
ORDER BY CategoryID, UnitPrice DESC

Using SQL Functions
The COUNT Function
The COUNT function in a SELECT statement returns a count of the number of records in a table (if the statement has a WHERE clause, it returns only the number of records that meet the specified condition).
The syntax for the COUNT function requires that the word COUNT be followed by a field name in parentheses; normally, you would place an asterisk between the parentheses to signify "any field": COUNT(*). The COUNT function counts records; it is not dependent on any particular field within a record.
Some database systems do not support the asterisk syntax on the COUNT function; on those systems the syntax COUNT(fieldname) must be used, and any field name would do.
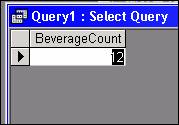
Example 19:
How many products are classified as beverages (category ID 1)?
SELECT COUNT(*) AS BeverageCount
FROM Products
WHERE CategoryID = 1
The SUM Function
The SUM function in a SELECT statement returns the sum of a numeric field or expression for all of records in a table (if the statement has a WHERE clause, it sums that field only for the records that meet the specified condition).
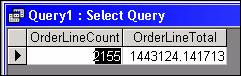
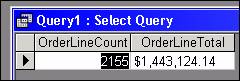
Example 20:
How many order lines do we have, and what is their total value?
SELECT COUNT(*) AS OrderLineCount, SUM(UnitPrice * Quantity * (1 + Discount)) AS OrderLineTotal
FROM [Order Details]
Note: If you wanted to format the total, you could wrap the Format$ function around the SUM expression as follows:
SELECT COUNT(*) AS OrderLineCount,
Format$(SUM(UnitPrice * Quantity * (1 + Discount)), "Currency") AS OrderLineTotal
FROM [Order Details]
The AVG, MAX, and MIN Functions
An AVG, MAX, or MIN function in a SELECT statement returns the average value, maximum value, or minimum value, respectively, of a numeric field for all of records in a table (if the statement has a WHERE clause, the function is performed for that field only for the records that meet the specified condition).
Example 21:
Display the total order line value, average order line value, highest order line value, and lowest order line value.
SELECT Format$(SUM(UnitPrice * Quantity * (1 + Discount)), "Currency") AS OrderLineTotal,
Format$(AVG(UnitPrice * Quantity * (1 + Discount)), "Currency") AS AverageOrderLine,
Format$(MAX(UnitPrice * Quantity * (1 + Discount)), "Currency") AS HighestOrderLine,
Format$(MIN(UnitPrice * Quantity * (1 + Discount)), "Currency") AS LowestOrderLine
FROM [Order Details]

Using DISTINCT
Example 22-a:
As a verification, run the query below to see that any particular customer may have more than one order in the Orders table:
SELECT * FROM Orders ORDER BY CustomerID
Example 22-b:
Use the DISTINCT keyword to show each customer in the ORDERS table only once.
SELECT DISTINCT CustomerID FROM Orders
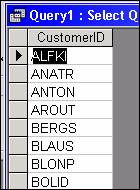
STOP. Do not get rid of the above query; we're going to save it shortly.
Now a problem is going to present itself. Suppose you are asked "how many customers have orders?" In Oracle and other DBMS' (but not Access), DISTINCT can be used as a function, which would enable you to satisfy this question using one query, like so:
SELECT COUNT(DISTINCT(CustomerID)) FROM Orders
Oracle would return the correct results, but attempting the above in Access would result in an error. What to do?
Sometimes it is necessary to run more than one query, back-to-back, to solve a particular problem (for example, the results of the first query would be used to "feed" the second query). This is exactly what we must do to answer the question "how many customers have orders?". Save the query you wrote in example 22-b as qryDistinctCust.
When you save a query, only the query definition is saved (when the query is run for the first time, it is compiled as well) – the output results of the query are not saved; they are recreated every time the query is run. FYI: In Access, saved queries are known as "QueryDefs" (at least, programmers call them that). In other database systems, saved queries may be called "views" or "stored procedures".
The "Make Table" (SELECT / INTO) Query
It is also possible to make a query that saves its results to a new table. Access calls this a "make table" query, and it is accomplished in SQL by using the INTO clause of the SELECT statement. (Note: Not all versions of SQL support SELECT / INTO).
Example 22-c:
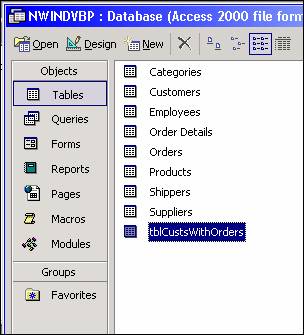
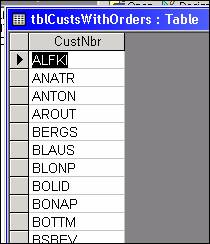
The following query will save its results to a table named tblCustsWithOrders:
SELECT DISTINCT CustomerID AS CustNbr
INTO tblCustsWithOrders
FROM Orders
Access may warn you that this will create a permanent table and that you can't undo this action. If so, click OK and let Access do its thing. If you check the Tables tab in Access, you'll see that this table is now there.
You
can check the results by either opening the table or by running the following
query:
SELECT * FROM tblCustsWithOrders
To get a count of the number of unique customers in the ORDERS table, we can use the COUNT function on either the newly created query or on the newly created table.
Example 22-d:
Get a count of the number of unique customers in the ORDERS table by using the COUNT function on the saved qryDistinctCust query (note that Access allows you to use a saved query (QueryDef) in place of a table name in a SELECT query).
SELECT COUNT(*) AS CustCount FROM qryDistinctCust
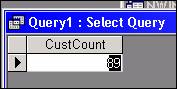
Example 22-e:
Get a count of the number of unique customers in the ORDERS table by using the COUNT function on the new tblCustsWithOrders table.
SELECT COUNT(*) AS CustCount FROM tblCustsWithOrders
Subqueries
On the right-hand side of a conditional expression in a WHERE clause, you can use a subquery to return a comparison value. The subquery, which must return only one column, is executed first. The result of the subquery is then incorporated into the main query. If the subquery can only return a single value (one row, one column), then a relational operator (like = or >) can be used, as in the next two examples.
Example 23:
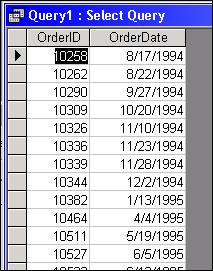
Show all fields of Order table for orders that were placed on the most recent order date.
SELECT *
FROM Orders
WHERE OrderDate = (SELECT MAX(OrderDate) FROM Orders)
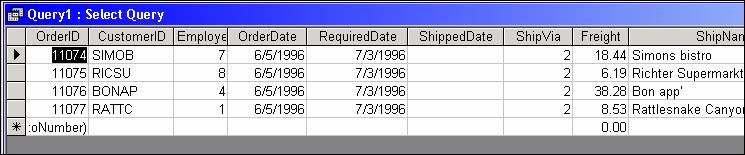
The above query works as follows: the subquery
SELECT MAX(OrderDate) FROM Orders
will execute and return one value (the date 6/5/1996). You can verify that result by looking at the Order table – you'll see that the latest date for any order is 6/5/1996. That result (6/5/1996) is then used as the comparison value in the outer WHERE clause, effectively making it read:
WHERE OrderDate = #6/5/1996#"
Note: The dates in this table do not have a time component to them. If they did, the query would have to do a little more work to specify the desired date.
Example 24:
Show the OrderID, ProductID, UnitPrice, Quantity, Discount, and line item total for order lines that exceed the average order line total.
SELECT OrderID, ProductID, UnitPrice, Quantity, Discount,
Format$(UnitPrice * Quantity * (1 + Discount), "Fixed") AS OrderLineTotal
FROM [Order Details]
WHERE (UnitPrice * Quantity * (1 + Discount)) > (SELECT AVG(UnitPrice * Quantity * (1 + Discount))
FROM [Order Details])
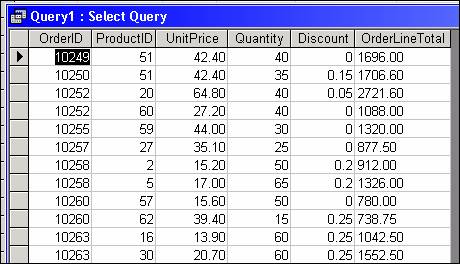
The above query works as follows: the subquery
SELECT AVG(UnitPrice * Quantity * (1 + Discount)) FROM [Order Details]
will execute and return one value ($669.66). You can verify that by looking at the results of example 21. That result ($669.66) is then used as the comparison value in the outer WHERE clause, effectively making it read:
WHERE (UnitPrice * Quantity * (1 + Discount)) > 669.66
If the subquery can return multiple values (multiple rows, one column each), then the keyword IN must be used instead of a relational operator. This type of query is typically used in multi-table queries, which are presented in Part II of this document. The next example is a "sneak preview" of a multi-table query that uses a subquery that returns multiple values.
Example 25:
Show the orders will be shipped by either Speedy Express or Federal Shipping.
SELECT *
FROM Orders
WHERE ShipVia
IN (SELECT ShipperID FROM Shippers WHERE CompanyName IN ('Speedy Express', 'Federal Shipping'))
The above query works as follows: the subquery
SELECT ShipperID FROM Shippers WHERE CompanyName IN ('Speedy Express', 'Federal Shipping')
will execute and return a result set consisting of two rows (one row containing the ShipperID for Speedy Express, the other containing the ShipperID for Federal Shipping). This result set will then supply the values to the IN clause, as if the query was written as follows:
SELECT *
FROM Orders
WHERE ShipVia IN (1, 3)
Grouping Data with the GROUP BY Clause
When you group data, you create a query that produces one record for each unique value of a field (or combination of fields) in a table (limited by the WHERE clause, if there is one). Any of the SQL functions discussed earlier (COUNT, SUM, AVG, etc.) apply to the grouped record.
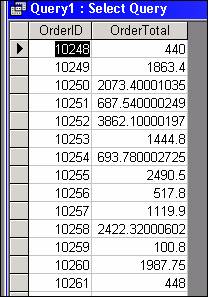
Example 26:
Show the order ID and order total for each order.
SELECT OrderID, SUM(UnitPrice * Quantity * (1 + Discount)) AS OrderTotal
FROM [Order Details]
GROUP BY OrderID
Using the HAVING clause
Just as the WHERE clause can be used to limit the rows that are included in the result of a SQL command, the HAVING clause can be used to limit the groups that are included.
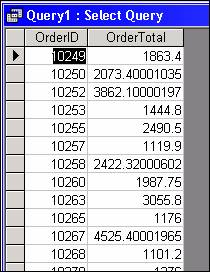
Example 27:
Show the order number and order total for each order, but include only orders that have a total greater than $1000.
SELECT OrderID, SUM(UnitPrice * Quantity * (1 + Discount)) AS OrderTotal
FROM [Order Details]
GROUP BY OrderID
HAVING SUM(UnitPrice * Quantity * (1 + Discount)) > 1000
FYI: Even when you use an alias for a computed column, you must still use the expression, not the alias, in the HAVING clause (this also applies to the WHERE and ORDER BY clauses – if a computed column is used with either of these, it is the expression, not the alias, that must be specified.)
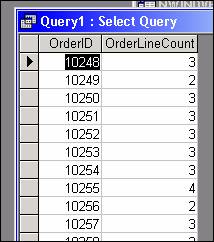
Example 28:
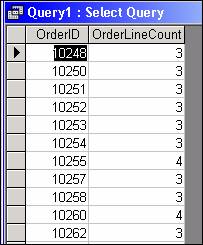
For each order, show the number of order lines that make up that order.
SELECT OrderID, Count(*) AS OrderLineCount
FROM [Order Details]
GROUP BY OrderID
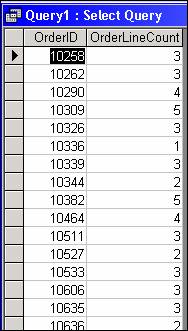
Example 29:
For each order, show the number of order lines that make up that order; but only include orders containing three or more items.
SELECT OrderID, Count(*) AS OrderLineCount
FROM [Order Details]
GROUP BY OrderID
HAVING Count(*) >= 3
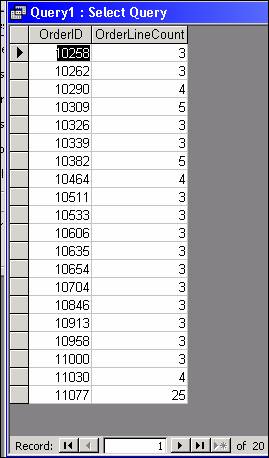
Example 30:
For each order, show the number of order lines that make up that order, but only for orders that include product IDs 4 or 5 (a "Chef Anton" product).
SELECT OrderID, Count(*) AS OrderLineCount
FROM [Order Details]
WHERE OrderID IN (SELECT OrderID FROM [Order Details] WHERE ProductID IN (4,5))
GROUP BY OrderID
In this example, the SQL interpreter must perform two "passes" behind the scenes. First it applies the WHERE clause to the table. From that resulting set of records, the grouping is performed.
Example 31:
For each order, show the number of order lines that make up that order, but only for orders that include product IDs 4 or 5 (a "Chef Anton" product) and that have at least three or more total items.
SELECT OrderID, Count(*) AS OrderLineCount
FROM [Order Details]
WHERE OrderID IN (SELECT OrderID FROM [Order Details] WHERE ProductID IN (4,5))
GROUP BY OrderID
HAVING Count(*) >= 3
As in the previous example, the SQL interpreter must perform a number of passes behind the scenes. First it applies the WHERE clause to the table. From that resulting set of records, the grouping is performed. From the grouped set of records, the HAVING clause is then applied.
Part II: Multiple-Table Queries (Joins)
One of the results of normalizing your tables is that most queries will draw on several tables in order to get the desired result. As a result, most of the queries you create will need to combine two or more tables. In Access SQL, tables are joined by specifying which fields of the tables you want to match on, either in a WHERE clause or in a JOIN clause.
Let's do an example first, then resume with a further explanation of how the join works.
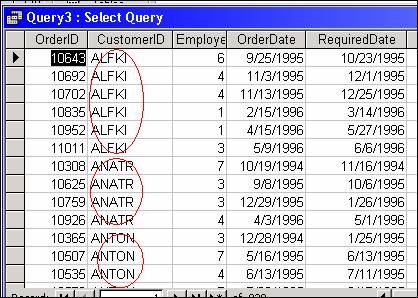
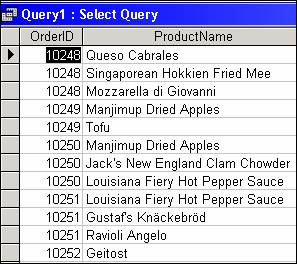
Example 32-a:
List the order ID and product name for each order line on the Order Details table.
SELECT OrderID, ProductName
FROM [Order Details], Products
WHERE [Order Details].ProductID = Products.ProductID
ORDER BY OrderID
In the syntax for the above query, note the following:
· Since we needed to draw from both the Order Details table and the Products table, both of those tables were specified in the FROM clause, separated by a comma.
· When you join two or more tables and those tables share common field names, those field names must be qualified in the query – this is the case in the query above for the ProductID field (both the Order Details and Products tables have a field with that names). To qualify a field name, use the syntax tablename.fieldname.
· To specify how the tables should be joined, a WHERE clause is used to specify a matching (equal) condition between the fields that link the two tables (usually, these are the fields that were involved in establishing a one-to-many relationship between the two tables).
To understand why the query works the way it does, let's explore a little relational database theory:
· The relational model specifies that the first step in creating a join is to generate the Cartesian product of the two tables. The Cartesian product for two tables is another (virtual) table contains records made up of every possible combination of records from the two joined tables. In the case of the Order Details and Products tables, the Cartesian product would be a virtual table of 165935 records (2155 Order Details records X 77 Products records): i.e., the data for each and every Products row would be joined with each and every Order Details row.
· From the Cartesian product, the records meeting the WHERE clause are extracted (thus, only records where the ProductID field matches are selected).
· From the matched records, the desired columns (as specified in the SELECT clause) are extracted, resulting in the final result set.
To reduce the amount of typing required by qualifying the field names with the table names, you can use a short alias on the table names with the AS clause, as in the following example:
Example 32-b:
Modify the query in 32-a to use table name aliases:
SELECT OrderID, ProductName
FROM [Order Details] AS OD, Products AS P
WHERE OD.ProductID = P.ProductID
ORDER BY OrderID
The above will produce the same results as example 32-a.
Note: Some database systems do not require (and some will not allow) the word AS to specify an alias (in those systems, the table name is separated from the alias name with just a blank space).
Using INNER JOIN
As an alternative to specifying the join criteria in the WHERE clause, Access SQL allows you to specify the join criteria with the INNER JOIN clause, which is part of the FROM clause. The basic syntax is:
SELECT fields
FROM table1 INNER JOIN table2 ON table1.field = table2.field
The INNER JOIN syntax is not supported on all database systems, but it is on most (including SQL Server and more recent versions of Oracle).
Example 32-c:
List the order ID and product name for each order line on the Order Details table. Use the INNER JOIN clause to specify the join criteria.
SELECT OrderID, ProductName
FROM [Order Details] AS OD INNER JOIN Products AS P ON OD.ProductID = P.ProductID
ORDER BY OrderID
The above will produce the same results as examples 32-a and 32-b.
WHERE vs. INNER JOIN
On the one hand, specifying join criteria with the WHERE clause is universally acceptable on all database systems that use SQL. On the other hand, INNER JOIN is preferred in Access SQL, because this format makes the join criteria explicit, rather than inferring it from the WHERE clause – the WHERE clause is then reserved for selection criteria, rather than doing dual-duty as a join specifier.
Future examples in this tutorial will show joins using both formats.
Example 33:
List the order ID, customer ID, and order date together with the sales rep first name and last name for the sales rep who made the order for all orders made in the month of September, 1994.
SELECT OrderID, CustomerID, OrderDate, FirstName, LastName
FROM Orders AS O, Employees AS E
WHERE O.EmployeeID = E.EmployeeID
AND OrderDate BETWEEN #9/1/1994# AND #9/30/1994#
ORDER BY OrderID
-- or –-
SELECT OrderID, CustomerID, OrderDate, FirstName, LastName
FROM Orders AS O INNER JOIN Employees AS E ON O.EmployeeID = E.EmployeeID
WHERE OrderDate BETWEEN #9/1/1994# AND #9/30/1994#
ORDER BY OrderID

In addition to joining tables with the WHERE clause or INNER JOIN clause, you can also join tables by using IN with a subquery. The next example illustrates this.
Example 34:
Find the description for every product included in order number 10250.
SELECT ProductName
FROM [Order Details] AS OD, Products AS P
WHERE OD.ProductID = P.ProductID
AND OD.OrderID = 10250
-- or --
SELECT ProductName
FROM [Order Details] AS OD INNER JOIN Products AS P ON OD.ProductID = P.ProductID
WHERE OD.OrderID = 10250
-- or --
SELECT ProductName
FROM Products
WHERE ProductID IN (SELECT ProductID FROM [Order Details] WHERE OrderID = 10250)
The next example joins three tables together and shows three different ways to get the results (joining with WHERE, INNER JOIN, or nested subquery):
Example 35:
Find the order ID and order date for every order that includes a product with "Chef Anton" in the product name.
SELECT DISTINCT O.OrderID, OrderDate
FROM Orders AS O, [Order Details] AS OD, Products AS P
WHERE O.OrderID = OD.OrderID
AND OD.ProductID = P.ProductID
AND P.ProductName LIKE '*Chef Anton*'
-- or --
SELECT DISTINCT O.OrderID, OrderDate
FROM (Orders AS O INNER JOIN [Order Details] AS OD ON O.OrderID = OD.OrderID)
INNER JOIN Products AS P ON OD.ProductID = P.ProductID
WHERE P.ProductName LIKE '*Chef Anton*'
-- or --
SELECT DISTINCT O.OrderID, OrderDate
FROM Orders AS O
WHERE OrderID IN (SELECT OrderID
FROM [Order Details]
WHERE ProductID IN (SELECT ProductID
FROM Products
WHERE ProductName LIKE '*Chef Anton*'))
Note: The DISTINCT keyword was used because if a particular order contained more than one "Chef Anton" product, that OrderID would be duplicated in the resultset. We only want to see the unique OrderIDs (and their dates) for all orders that have one or more Chef Anton products.
Comprehensive Example
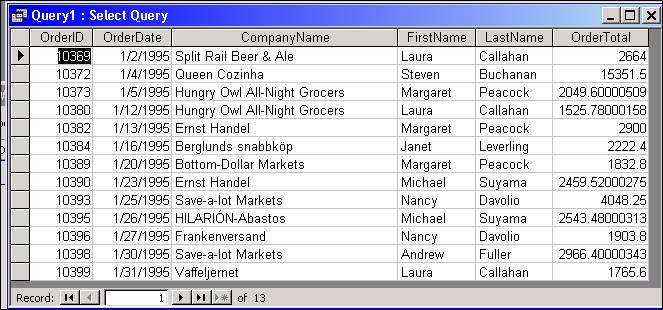
Example 36:
This query incorporates most of the major SQL clauses discussed so far. This query joins four tables together to show the Order ID, order date, customer (company name), employee name and order total for all orders made in the month of January 1995 that totalled $1500 or more.
SELECT O.OrderID, O.OrderDate, C.CompanyName, E.FirstName, E.LastName,
SUM(OD.UnitPrice * OD.Quantity * (1 + OD.Discount)) AS OrderTotal
FROM Orders AS O, [Order Details] AS OD, Customers AS C, Employees AS E
WHERE O.OrderID = OD.OrderID
AND O.CustomerID = C.CustomerID
AND O.EmployeeID = E.EmployeeID
AND O.OrderDate BETWEEN #1/1/1995# AND #1/31/1995#
GROUP BY O.OrderID, O.OrderDate, C.CompanyName, E.FirstName, E.LastName
HAVING SUM(OD.UnitPrice * OD.Quantity * (1 + OD.Discount)) >= 1500
-- or --
SELECT O.OrderID, O.OrderDate, C.CompanyName, E.FirstName, E.LastName,
SUM(OD.UnitPrice * OD.Quantity * (1 + OD.Discount)) AS OrderTotal
FROM ((Orders AS O INNER JOIN [Order Details] AS OD ON O.OrderID = OD.OrderID)
INNER JOIN Customers AS C ON O.CustomerID = C.CustomerID)
INNER JOIN Employees AS E ON O.EmployeeID = E.EmployeeID
WHERE O.OrderDate BETWEEN #1/1/1995# AND #1/31/1995#
GROUP BY O.OrderID, O.OrderDate, C.CompanyName, E.FirstName, E.LastName
HAVING SUM(OD.UnitPrice * OD.Quantity * (1 + OD.Discount)) >= 1500
Outer Joins
The INNER JOIN retrieves records only when there is a match in both tables. In some cases, you may want to retrieve the values from one table even when there are no matching values in the other joined table. For example, suppose you wanted a list of all employees showing the orders that they placed in a given week (if any). To accomplish this, you could perform an outer join between the Employees table and the Orders table.
Instead of using the keywords "INNER JOIN", you use "LEFT OUTER JOIN" or "RIGHT OUTER JOIN" (the keyword "OUTER" is optional; the keyword "LEFT" or "RIGHT" implies an outer join; in fact, in some DBMS', the keyword OUTER is not allowed).
Example 37:
List the employee first name and employee last name for all employees, together with the order IDs and order dates for orders made by that employee (if any) for the week of September 26 through September 30, 1994. (If an employee made more than one order during that time period, that employee will show up more than once.)
Note: In order for this
query to produce the desired results, a table expression (sometimes
called an in-line view or in-line table) is used as the second
table being joined in the SQL statement. In many cases, most DBMS' will allow a
table expression to be used where a table name is expected. The table
expression SELECT * FROM Orders WHERE OrderDate BETWEEN #9/26/1994# AND
#9/30/1994# specifies a subset of records from the Orders table for the
desired date range.
SELECT E.FirstName, E.LastName, O.OrderID, O.OrderDate
FROM Employees AS E
LEFT JOIN (SELECT * FROM Orders WHERE OrderDate BETWEEN #9/26/1994# AND #9/30/1994#) AS O
ON E.EmployeeID = O.EmployeeID
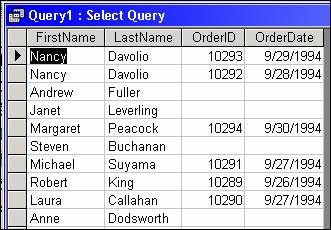
In the results above, for employees that don't have orders, the OrderID and OrderDate columns will contain NULL. This fact can be used in the type of query that asks the question, "which employees do NOT have orders?":
Example 38:
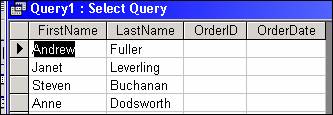
List the employee first name and employee last name for all employees for that had no orders for the week of September 26 through September 30, 1994.
SELECT E.FirstName, E.LastName, O.OrderID, O.OrderDate
FROM Employees AS E
LEFT JOIN (SELECT * FROM Orders WHERE OrderDate BETWEEN #9/26/1994# AND #9/30/1994#) AS O
ON E.EmployeeID = O.EmployeeID
WHERE O.OrderID IS NULL
Self-Joins
It is possible to create a join between a table and a second instance of the same table. A common example is an Employees table in which the "ReportsTo" field (i.e., the employee's supervisor) contains EmployeeID values found in the Employees table itself.
The following example joins the Employees table to itself. The ReportsTo field in the first instance of the table is linked to the EmployeeID field in the second instance.
Example 39-a:
List the employee ID, last name, and first name for each employee, together with the last name and first name of that employee's supervisor.
SELECT E1.EmployeeID, E1.LastName, E1.FirstName,
E2.LastName, E2.FirstName
FROM Employees AS E1 INNER JOIN Employees AS E2
ON E1.ReportsTo = E2.EmployeeID
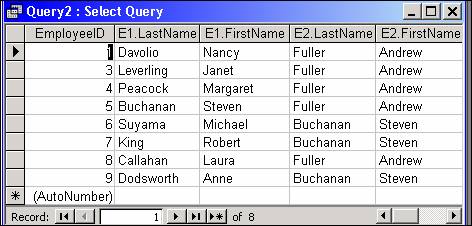
Because an inner join was specified, if the value in the ReportsTo field of any given record isn't also found in the EmployeeID field, the record isn't selected. This would leave out records where the ReportsTo field is NULL, perhaps indicating that the employee is a supervisor and doesn't report to another employee in the Employees table (as is the case for Andrew Fuller).
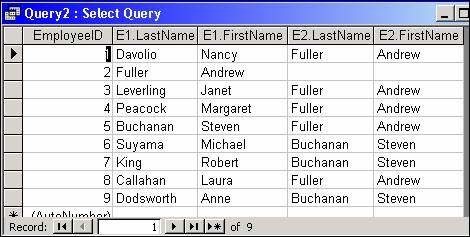
Example 39-b:
Revise the query written in exercise 41-a to use a LEFT JOIN, so that all employee records will be selected, whether or not they have a supervisor:
SELECT E1.EmployeeID, E1.LastName, E1.FirstName,
E2.LastName, E2.FirstName
FROM Employees AS E1 LEFT JOIN Employees AS E2
ON E1.ReportsTo = E2.EmployeeID
UNION Queries
A union query is one which creates a result set consisting of the results of two or more queries appended to one another with any duplicates removed.
Example 40:
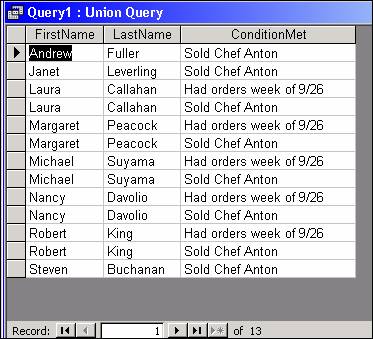
List the employee first name and employee last name for employees that either placed orders on the week of September 26 through September 30, 1994, or employees that ever had an order containing a Chef Anton product (product IDs 4 or 5), or both. Include in the listing a column indicating which of these conditions was met.
SELECT FirstName, LastName, 'Had orders week of 9/26' AS ConditionMet
FROM Employees AS E INNER JOIN Orders AS O ON E.EmployeeID = O.EmployeeID
WHERE OrderDate BETWEEN #9/26/1994# AND #9/30/1994#
UNION
SELECT FirstName, LastName, 'Sold Chef Anton'
FROM (Employees AS E INNER JOIN Orders AS O ON E.EmployeeID = O.EmployeeID)
INNER JOIN [Order Details] AS OD ON O.OrderID = OD.OrderID
WHERE OD.ProductID IN (4, 5)
The rules for union queries in Access SQL are as follows:
· All queries in a UNION must request the same number of fields, but they don't have to be the same size or data type (this restriction does exist in other database systems).
· Use aliases only in the first SELECT statement, because they are ignored in all others
· You can use a GROUP BY or HAVING clause in each query argument to group the returned data
·
You can use an ORDER BY clause at
the end of the last query argument to display the returned data in a
specified order. In the ORDER BY clause, refer to fields by what they are
called in the first SELECT statement.
Part III: Updating Data and DDL Queries
It goes without saying that caution should be exercised whenever you run a query that can change or delete data in a table. It is a good idea to backup your database or to work with test tables when you are in a testing mode.
The UPDATE Query
Example 41:
Change the contact name for Customer ID "AROUT" to "John Smith"
· First, run this SELECT query to look at the existing data:
SELECT CustomerID, ContactName
FROM Customers
(Note that the contact name for Customer ID "AROUT" is '"Thomas Hardy".)
· Next, run the UPDATE query:
UPDATE Customers
SET ContactName = 'John Smith'
WHERE CustomerID = 'AROUT'
· Finally, run another SELECT query to verify the change that you made:
SELECT CustomerID, ContactName
FROM Customers
(Note the change)
Note: Without the WHERE clause in the UPDATE, ALL records would have the ContactName field updated to 'John Smith' (and that wouldn't be good).
Example 42:
Due to an increase in the price of sugar, you must increase the unit price of all products in the "Confections" category (Category ID 3) by 3%.
· First, run a SELECT query to look at the existing data:
SELECT * FROM Products ORDER BY CategoryID
· Next, run the UPDATE query:
UPDATE Products
SET UnitPrice = UnitPrice * 1.03
WHERE CategoryID = 3
· Finally, run another SELECT query to verify the changes that you made:
SELECT * FROM Products ORDER BY CategoryID

Although not shown in the examples, you can change multiple fields with the SET clause by separating each "column = value" item with a comma:
UPDATE Customers SET ContactName = 'John Smith', ContactTitle = 'Sales Manager', FAX = '123-456-7890' WHERE ...
Combining UPDATE with INNER JOIN
A very useful feature of the UPDATE statement is its ability to join tables so that you can update data in one table based on data in another table. Such an update is sometimes called a "batch update" or "mass update". (Not all database systems allow this form of the UPDATE statement.)
For example, suppose price updates for certain products were entered into an Excel spreadsheet and you needed to update the UnitPrice field of the Products table with those new prices. You could link to the Excel spreadsheet (which would cause Access to look at the spreadsheet as if it were a table), then run the UPDATE query using the Products table and the linked table. The example below shows you how to do all that:
· Open Excel, and create the simple spreadsheet shown below. Save the spreadsheet as PriceUpdate.xls (it does not matter what folder you save it to, but you will need to remember the location for the steps that follow), then exit Excel.
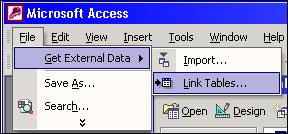
· Back in Access (in our NWINDVBP database), go to the File menu and select Get External Data -> Link Tables, as shown below:
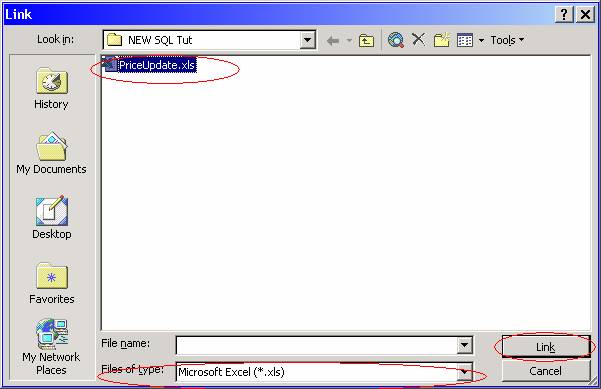
· In the Link dialog box that comes up, select "Microsoft Excel(*.xls)" from the "Files of type" drop-down list, navigate to the folder where you saved the spreadsheet, select the PriceUpdate.xls file and click the Link button:
· The Link Spreadsheet Wizard appears. The initial pre-selections should be correct, so click Next.
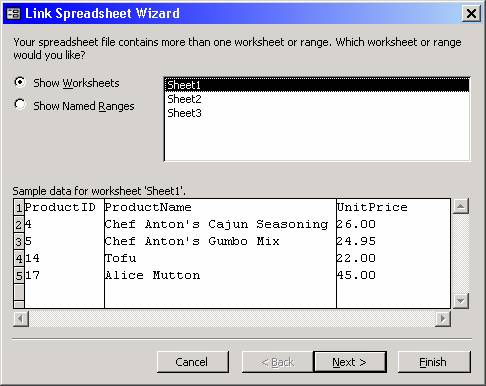
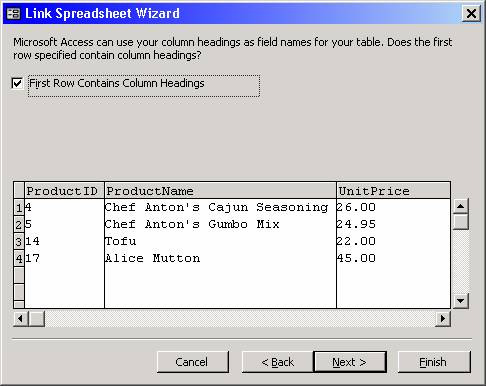
· On the next page of the wizard, ensure that the "First row contains column headings" box is checked (see below). After checking the box (or verifying that it is checked), click Next.
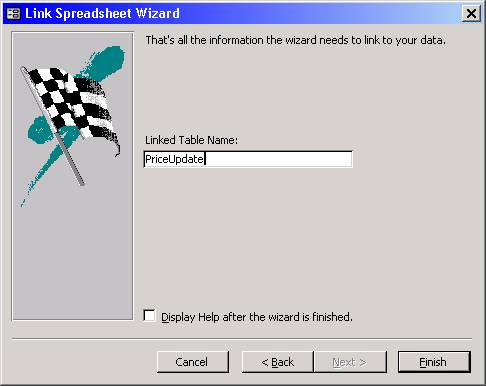
· On the last page of the wizard, type PriceUpdate for the linked table name. When you are done, click Finish.
· You should get a message that the wizard completed successfully. You should then see an entry for the linked table in the Tables tab of the Access database (it will appear in the list of tables with a special icon):
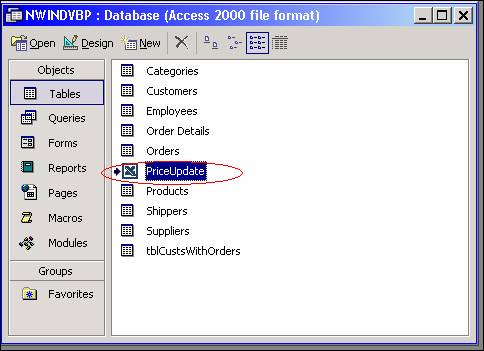
At this point, PriceUpdate can be used just like any other table in the database.
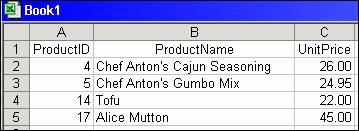
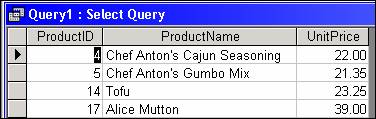
Example 43:
Update the unit price data in the Products table with data for the corresponding products in the PriceUpdate spreadsheet.
· First, run a SELECT query to look at the existing data (for the sake of the example, we know that we are going to update four particular products):
SELECT ProductID, ProductName, UnitPrice
FROM Products
WHERE ProductID IN (4, 5, 14, 17)
· Next, run the UPDATE query:
UPDATE Products INNER JOIN PriceUpdate
ON Products.ProductID = VAL(PriceUpdate.ProductID)
SET Products.UnitPrice = PriceUpdate.UnitPrice
Note: The VAL function was used on the PriceUpdate.ProductID field because when the PriceUpdate spreadsheet was linked, Access treated that field as text rather than numeric (and the Link Wizard does not provide a way to specify the data type of the linked fields). The ProductID from the spreadsheet must be treated as a number in order to join with the ProductID from the Products table. Access did not have a problem maintaining the numeric data type of the unit price, which contains a decimal point.
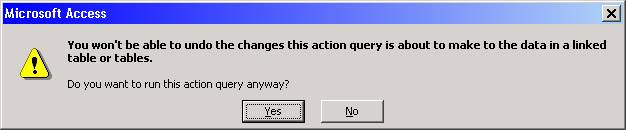
When you run the above UPDATE query, you may get a prompt similar to the following. For our example, you should respond Yes.
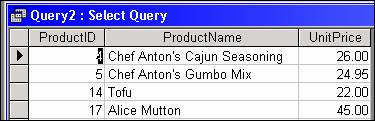
· Finally, re-run your SELECT query from above to see the results of your changes:
SELECT ProductID, ProductName, UnitPrice
FROM Products
WHERE ProductID IN (4, 5, 14, 17)
The DELETE Query
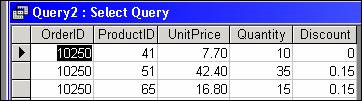
Example 44:
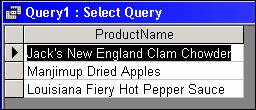
Mario Pontes from the Hanari Carnes company calls to tell you to remove the Manjimup Dried Apples from the order that was placed on August 8, 1994. You determine that this is order ID 10250 and that the product in question is Product ID 51.
· First, run this SELECT query to look at the existing data:
SELECT * FROM [Order Details]
WHERE OrderID = 10250
· Next, run the DELETE query:
DELETE FROM [Order Details]
WHERE OrderID = 10250
AND ProductID = 51
Note that you must specify BOTH OrderID AND the ProductID so that you delete the one exact row form the table. Otherwise, you will delete too much data (and your other customers will not be happy!)
When you run the above DELETE query, you may get a prompt from Access telling you that 1 row will be deleted and that the action cannot be undone. For our example, you should respond Yes.
· Finally, re-run the SELECT query from above to verify the results:
SELECT * FROM [Order Details]
WHERE OrderID = 10250
Warning: If you issue a DELETE statement without a WHERE clause, you will delete ALL records in that table (the table itself and its structure will remain intact). To completely remove a table, use the DROP TABLE statement.
Although a hands-on example will not be given here, just as an UPDATE query can update records in one table based on matching data in another table, a DELETE query can also be based on a multiple-table join (records in one table can be deleted based on matching values in another table).
This (non-hands-on) example query joins the Categories table to the Products table, and deletes records in the Products table that match the selection criterion specified for the Categories table:
DELETE Products.*
FROM Categories INNER JOIN Products
ON Categories.CategoryID = Products.CategoryID
WHERE Categories.CategoryName = 'Beverages'
The Append Query (INSERT INTO)
The INSERT INTO statement has two basic formats. To insert one row into a table, you can use the INSERT INTO ... VALUES format; to insert multiple rows into a table from another table, you can use the INSERT INTO ... SELECT format. The INSERT INTO ... VALUES format will be shown first.
Example 45:
Insert a record for our new shipper, International Parcel Service. Their phone number is (800) 888-9999.
INSERT INTO Shippers (CompanyName, Phone)
VALUES ('International Parcel Service', '(800) 888-9999')
To check out the results, do a SELECT query:
SELECT * FROM Shippers

Note that in the INSERT statement above, the ShipperID was NOT specified. This is because the ShipperID field is defined as an Autonumber field, thus, whenever a new record is added to the Shippers table, the ShipperID field will automatically populate with the next available number.
In the next example, we will use the SQL DDL statement CREATE TABLE to create a new table. Then we will use INSERT INTO with the SELECT option to populate this new table with some data from the Customers table.
Creating a New Table
The Access SQL CREATE TABLE command has this basic syntax:
CREATE TABLE tablename (
field1 type [(size)] [NOT NULL] [single-field CONSTRAINT clause]
[, field2 type [(size)] [NOT NULL] [single-field CONSTRAINT clause]
[, ...]]
[, mutliple-field CONSTRAINT clause [, ...]])
The CREATE TABLE statement has these parts:
|
tablename |
The name of the table to be created. |
||||||||||||||||||||||||||
|
field1, field2 |
The name of field or fields to be created in the new table. You must create at least one field. |
||||||||||||||||||||||||||
|
type |
The data type of field in the new table. The keywords that can be used are shown below:
(Note: If CHAR or CHARACTER is used, a fixed-length text field is established; this is the only way a fixed-length text field can be defined. In the Access UI, Text fields are always variable-length and there is no way to specify otherwise there.)
|
||||||||||||||||||||||||||
|
size |
The field size in characters (Text fields only). If size is omitted for a Text field, 255 is the default. |
||||||||||||||||||||||||||
|
NOT NULL |
Specifies that the field may not contain NULL values (an entry is required) |
||||||||||||||||||||||||||
|
single-field CONSTRAINT clause
|
This clause has the following syntax:
CONSTRAINT constraint-name {PRIMARY KEY | UNIQUE | NOT NULL | REFERENCES foreigntable [(foreignfield1, foreignfield2)]}
If PRIMARY KEY or UNIQUE is specified, an index of that type is established for this field. NOT NULL can either be specified as a named constraint or as a stand-alone clause (as seen above). The REFERENCES option establishes this field as foreign key, related to the primary key in another table. |
||||||||||||||||||||||||||
|
multiple-field CONSTRAINT clause
|
This clause has the following syntax:
CONSTRAINT name {PRIMARY KEY (primary1[, primary2 [, ...]]) | UNIQUE (unique1[, unique2 [, ...]]) | NOT NULL (notnull1[, notnull2 [, ...]]) | FOREIGN KEY (ref1[, ref2 [, ...]]) REFERENCES foreigntable [(foreignfield1 [, foreignfield2 [, ...]])]}
|
Example 46:
Create a new table called US_CUSTOMERS, which has the same structure as the existing Customers table.
CREATE TABLE US_CUSTOMERS
(CustomerID TEXT(5) CONSTRAINT PrimaryKey PRIMARY KEY,
CompanyName TEXT(40) NOT NULL,
ContactName TEXT(30),
ContactTitle TEXT(30),
Address TEXT(60),
City TEXT(15),
Region TEXT(15),
PostalCode TEXT(10),
Country TEXT(15),
Phone TEXT(24),
Fax TEXT(24))
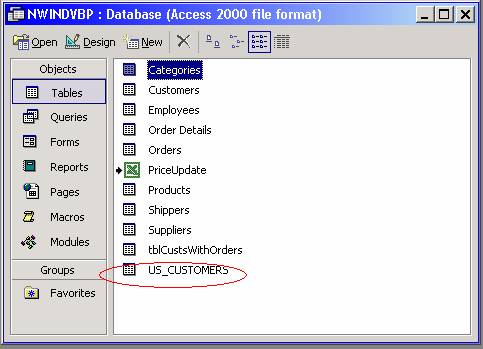
If you switch over to the Tables tab, you'll see that US_CUSTOMERS has been added to the list of tables.
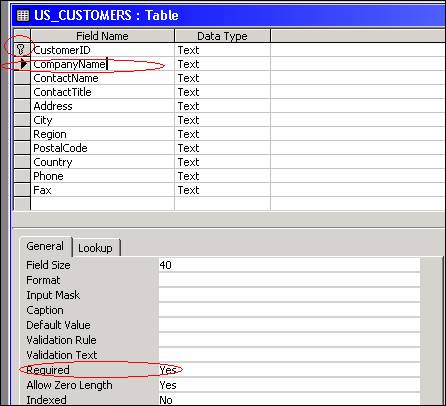
If you click the design button, you'll see how the fields have been set up based upon what has been coded in the CREATE TABLE statement. Note that the CustomerID field has been designated as the primary key and that by specifying NOT NULL for CompanyName, the Required property is set to "Yes".
Example 47:
Populate the US_CUSTOMERS table with data from the Customers table. Include only those rows for which Country is "USA".
INSERT INTO US_CUSTOMERS (CustomerID,
CompanyName,
ContactName,
ContactTitle,
Address,
City,
Region,
PostalCode,
Country,
Phone,
Fax)
SELECT CustomerID,
CompanyName,
ContactName,
ContactTitle,
Address,
City,
Region,
PostalCode,
Country,
Phone,
Fax
FROM Customers
WHERE Country = 'USA'
Check your results with a SELECT statement:
SELECT * FROM US_CUSTOMERS
Note: Although it is a "best practice" to specify the column names on both the INSERT part and the SELECT part of the query above, in the case where ALL fields from the source table will be inserted into the target table, you could get away with a shortened form of this query, as follows:
INSERT INTO US_CUSTOMERS
SELECT *
FROM Customers
WHERE Country = 'USA'
Changing the Table Structure
Adding a Column
Example 48:
Add a one-character field called CUSTOMER_TYPE to the US_CUSTOMERS table.
ALTER TABLE Customers
ADD RG_CODE TEXT(1);
Verify your results by looking at the US_CUSTOMERS table in design view:
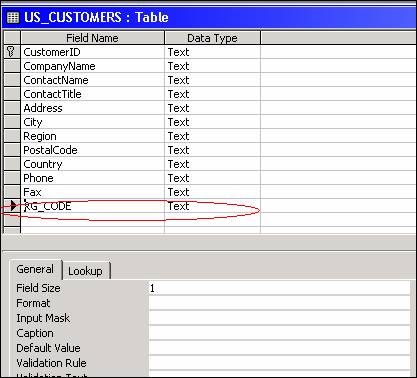
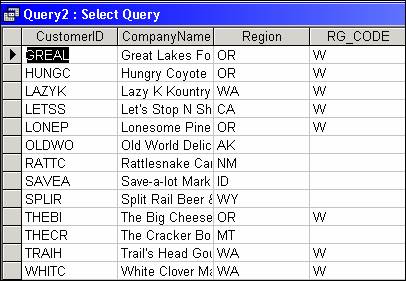
To populate the new column in Access, you can an UPDATE statement. In our example, we want to set the RG_CODE to "W" for states on the west coast (California, Oregon, or Washington). The query is:
UPDATE Customers SET RG_CODE = 'W'
WHERE Region IN ('CA', 'OR', 'WA')
Verify the results with a SELECT statement:
SELECT CustomerID, CompanyName, Region, RG_CODE
FROM US_CUSTOMERS
Changing a Column Definition
In Access, you cannot use the ALTER TABLE statement to change the size or data type of a column. To do that you must create a new table that duplicates the original table but has the new column definition. You can then copy the data from the old table to the new table (using the SQL INSERT statement), delete the original table, and rename the new table to the old name. If the old table has relationships with other tables, those relationships must be deleted before you can delete the old table. Once the new table is in place, the relationships with the other tables can be re-established.
Some database systems, such as Oracle, let you change a column definition with the MODIFY clause of the ALTER TABLE statement. The following is acceptable in Oracle (but not Access):
ALTER TABLE US_CUSTOMER
MODIFY Address VARCHAR2(75);
Note: In Oracle, a variable length text field is specified with the keyword VARCHAR2.
Deleting a Column
Example 49:
Drop the Fax column from the US_CUSTOMERS table.
ALTER TABLE US_CUSTOMERS
DROP COLUMN Fax
Verify the results by looking at the US_CUSTOMERS table in design view.
DROP COLUMN is not supported by all database systems (such as Oracle). To accomplish this in a system that does not support DROP COLUMN, the following four steps would be necessary:
1. create new table, leaving out the column to be dropped
2. copy the other columns over from the new table
3. drop the old table
4. rename the new table to the old table name.
Dropping and Adding Constraints
The ALTER TABLE statement can also be used to drop a constraint from or add a constraint to an existing field in a table. In the next two exercises, we will drop the primary key constraint from the US_CUSTOMERS table, then add it back.
Example 50:
Drop the primary key constraint from the US_CUSTOMERS table. (Recall from the CREATE TABLE statement that we named that constraint PrimaryKey.)
ALTER TABLE US_CUSTOMERS
DROP CONSTRAINT PrimaryKey
Verify your results by looking at the US_CUSTOMERS table in Design View. Note that the Primary Key designation is gone.
Example 51:
Add the primary key constraint back to the US_CUSTOMERS table.
ALTER TABLE US_CUSTOMERS
ADD CONSTRAINT PrimaryKey PRIMARY KEY(CustomerID)
Verify your results by looking at the US_CUSTOMERS table in Design View. Note that the Primary Key designation is back.
Deleting a Table
Example 52:
Get rid of the US_CUSTOMERS table.
DROP TABLE US_CUSTOMERS
Verify your results by looking at the Tables tab of the database. Note that US_CUSTOMERS is gone.
It goes without saying that you should be VERY CAREFUL when dropping a table, or for that matter, when deleting data. Make sure you have a backup.
Creating a Database Structure from Scratch
This last example shows you how you can generate an entire database structure using CREATE TABLE statements. This exercise has you build your own version of the BIBLIO.MDB database that comes with both Access and VB. (If you do not have BIBLIO.MDB, you can download it here.)
· On your hard disk, locate BIBLIO.MDB and open it.
· Examine the table structures in the tables' design view.
· Go to Tools -> Relationships and examine the ways in which the tables are related.
· Close the database (but leave Access open)
· Go to File -> New Database, and select a blank database
· When asked to name the new database, call it MYBIBLIO.MDB
· In SQL view, enter the following four CREATE TABLE queries:
CREATE TABLE Authors
(Au_ID AUTOINCREMENT CONSTRAINT Au_ID_PK PRIMARY KEY,
Author TEXT(50),
[Year Born] SHORT);
CREATE TABLE Publishers
(PubID AUTOINCREMENT CONSTRAINT PubID_PK PRIMARY KEY,
Name TEXT(50),
[Company Name] TEXT(255),
Address TEXT(50),
City TEXT(20),
State TEXT(10),
Zip TEXT(15),
Telephone TEXT(15),
Fax TEXT(15),
Comments MEMO);
CREATE TABLE Titles
(Title TEXT(255),
[Year Published] SHORT,
ISBN TEXT(20) CONSTRAINT ISBN_PK PRIMARY KEY,
PubID LONG CONSTRAINT PubID_FK REFERENCES Publishers(PubID),
Description TEXT(50),
Notes TEXT(50),
Subject TEXT(50),
Comments MEMO);
CREATE TABLE [Title Author]
(ISBN TEXT(20) CONSTRAINT ISBN_FK REFERENCES Titles(ISBN),
Au_ID LONG CONSTRAINT Au_ID_FK REFERENCES Authors(Au_ID),
CONSTRAINT TA_PK PRIMARY KEY(ISBN, Au_ID));
· Examine your results in the tables' design view and in Tools -> Relationships.