Control Basics
The GUI aspects of VB.NET programming involves the use of the various controls that are available in the toolbox. With controls come properties (a set of variables that describe the appearance, behavior, and other aspects of the control), methods (procedures built into a control that tell the control how to do things), and events (actions that occur in your program). Properties, methods, and events common to most controls are described in the tables below.
Common Properties of Visual Basic .NET Controls
Every object, such as a form or control, has a set of properties that describe it. Although this set isn't identical for all objects, some properties (such as those listed in the table below) are common to most controls. You can see every design-time property for a given control by looking at the Properties window in the IDE (some controls have properties that are available only at run-time – such as the SelectionStart and SelectionLength properties of the Textbox).
|
Property |
Description |
|
BackColor |
Specifies the background color of the control. |
|
BorderStyle |
Generally, specifies whether or not a control has a border. |
|
Text |
The string of text that is to be displayed in the control. |
|
Enabled |
Determines whether or not the control can respond to user-generated events. |
|
Font |
For controls displaying text, specifies the font (name, style, size, etc.) to be applied to the displayed text. |
|
ForeColor |
Specifies the color of text or graphics to be displayed in the control. |
|
Height |
Specifies the height of the control in pixels. |
|
Left |
Specifies the distance (in pixels) between the internal left edge of a control and the left edge of its containter. |
|
Name |
The string value used to refer to the control in code. |
|
Image |
Specifies the graphic to be displayed in the control. |
|
TabIndex |
Specifies the tab order of a control within its parent form, |
|
TabStop |
Specifies whether or not the user can use the Tab key to give focus to the control. |
|
Tag |
A string containing extra data associated with the control. |
|
Top |
Specifies the distance (in pixels) between the internal top edge of a control and the top edge of its containter. |
|
Visible |
Specifies whether the control is visible or hidden. |
|
Width |
Specifies the width of the control in pixels. |
Common Methods of Visual Basic .NET Controls
Methods are blocks of code designed into controls that tell the control how to do things, such as move to another location on a form. Just as with properties, not all controls have the same methods, although some common methods do exist, as shown in the table below:
|
Method |
Description |
|
Focus |
Gives focus to the object specified in the method call |
|
Move |
Changes an object's position in response to a code request |
|
Drag |
Handles the execution of a drag-and-drop operation by the user |
Common Events of Visual Basic .NET Controls
Events are what happen in and around your program. For example, when a user clicks a button, many events occur: The mouse button is pressed, the button in your program is clicked, and then the mouse button is released. These three things correspond to the MouseDown event, the Click event, and the MouseUp event. During this process, the Focus event for the CommandButton and the LostFocus event for whichever object previously held the focus also occur.
Again, not all controls have the same events, but some events are shared by many controls. These events occur as a result of some specific user action, such as moving the mouse, pressing a key on the keyboard, or clicking a text box. These types of events are user-initiated events and are what you will write code for most often. Events common to most VB controls are described in the table below.
|
Event |
Occurs When ... |
|
TextChanged |
The user modifies text in a combo box or text box. |
|
Click |
The user clicks the primary mouse button on an object. |
|
DoubleClick |
The user double-clicks the primary mouse button on an object. |
|
DragDrop |
The user drags an object to another location. |
|
DragOver |
The user drags an object over another control. |
|
GotFocus |
An object receives focus. |
|
KeyDown |
The user presses a keyboard key while an object has focus. |
|
KeyPress |
The user presses and releases a keyboard key while an object has focus. |
|
KeyUp |
The user releases a keyboard key while an object has focus. |
|
LostFocus |
An object loses focus. |
|
MouseDown |
The user presses any mouse button while the mouse pointer is over an object. |
|
MouseMove |
The user moves the mouse pointer over an object. |
|
MouseUp |
The user releases any mouse button while the mouse pointer is over an object. |
Buttons, Text Boxes, and Labels
Three of the most basic controls involved in building an interface are buttons, text boxes, and labels.
Buttons
Buttons (called "command buttons" in previous versions of VB) are generally used to begin, interrupt, or end a particular process. A user will often use a button either by clicking it or by tabbing to it and pressing Enter (either of these actions will cause the code behind the button's Click event to be executed). Another way of invoking the button's Click event is to set up an "access key" for it (this is shown in the sample program below).
In addition, there are two properties of the Form that you can set which will cause a button to be clicked: you can specify an AcceptButton and a CancelButton. By specifying a particular button as the AcceptButton, the code in that button's Click event will execute when the user presses the Enter key. By specifying a particular button as the CancelButton, the code in that button's Click event will execute when the user presses the Esc key.
Labels
A label control is used to display text that a user cannot edit directly. However, you can write code to change the text that is displayed by assigning a string value to the label's Text property. Common uses of the label control are to display a message to the user and to identify another control (such as a textbox) so that the user has an idea of what should be entered into that textbox.
Text Boxes
A textbox control (sometimes referred to as an edit field, edit box, or text entry control) is used to display information entered either by you at design time, by the user at run time, or by an assignment statement in the program code. The displayed text may be accessed by setting or reading the textbox's Text property.
Sample Program
Following is the step-by-step process to build a program that adds two numbers together. A simple task, yes, but one that illustrates several concepts related to the controls discussed above. The steps are as follows:
1. Start VB2010 Express and select "New Project", then in the dialog box that follows (shown below) select Windows Forms Application. Give the project a name (such as AddEm) and click OK.

At this point, VB2010 Express has started a new project for you and has provided you with one form.
2. Click on the form to make sure it is the active window, then click the Properties window. If the Properties window is not displayed on the screen, you can display it by doing one of the following three things: (1) press F4, (2) click the Properties button on the toolbar (the icon is a hand pointing to a piece of paper), or (3) click View, then Properties Window from the VB menu.
Set the following properties of the form:
Property Setting
(Name) frmAddEm
Text Add Program
3. Using the figure below as a guide, place the necessary controls from the toolbox onto the form. The three basic VB controls are the Label, Textbox, and Button; these are the controls we will be working with for this program.
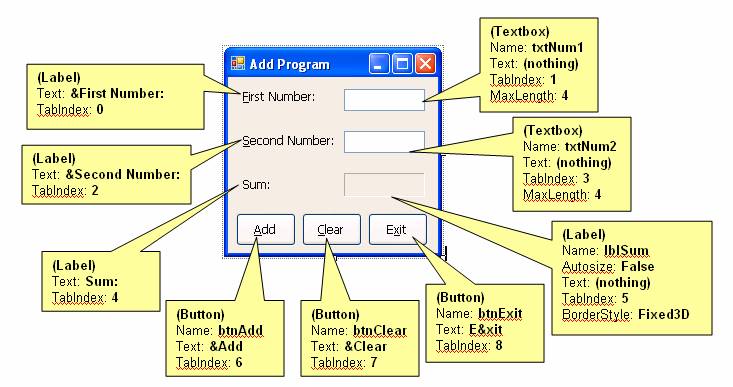
Note on access keys:
An access key is a key combination that a user can press (usually the Alt key plus a letter) to invoke an action. Access keys provide a keyboard alternative to using the mouse to perform the same action. For example, most Windows programs that have a File menu will let you open that File menu either by using your mouse to click on the word "File" or by pressing the Alt+F key combination on your keyboard. The "F" in this case would be considered the access key.
You can create an access key on most non-editable controls that have a Text property (such as a label or a button) by placing an ampersand (&) to the left of the desired letter. On the form, the letter shows up as underlined once the Alt key is pressed.
For a button, pressing Alt + the underlined key is the same as clicking the button; it causes the button's "Click" event to fire (more on that shortly). On a label, provided that the TabIndexes are set properly, the access key causes focus to go to next control that can receive focus (normally the textbox). Note on "focus": When a control is "active" – meaning it is either waiting to receive input or is highlighted – that control is said to have the "focus".
Note on the TabIndex property
Most controls have a TabIndex property. Using the TabIndex property, you can control the sequence of controls that will receive the focus when the user navigates your form via the keyboard. As the user traverses your form by pressing the Tab key, controls will receive focus in the order specified by the TabIndexes. Note that in this sample project, I am calling for the TabIndexes of the nine controls to be in sequence from left to right, top to bottom (we start numbering the TabIndexes with 0, thus the TabIndexes of the controls range from 0 to 8).
Certain controls, such as labels, cannot receive focus. However, if you have a label control paired up with a textbox, and you set the TabIndex of the label control to a value one less the TabIndex of the textbox, then you can use an access key on the label's Text property. When you do this, you set up a situation such that when the user uses the access key of the label, focus will move to the textbox whose TabIndex has a value one greater than the label's TabIndex.
Setting the TabIndexes "visually":
New in the .NET era of Visual Basic (and something that "would have been nice" in the classic versions of the Visual Basic IDE) is the ability to set TabIndexes for controls visually at design-time. To do this, go to the View menu and select Tab Order, as shown below:
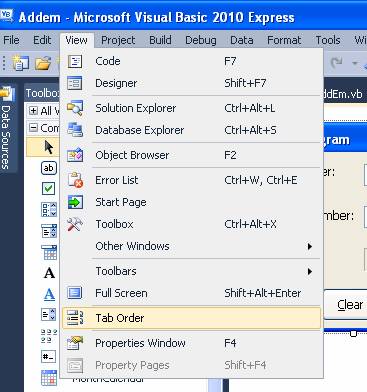
NOTE: If you do not see the "Tab Order" option in the View menu, go to Tools à Settings and choose Expert Settings. VB will take a couple of seconds to reset itself, and then Tab Order should be available in the View menu. Another note: in order for "Tab Order" to appear in the View menu, you must select the form itself; an individual control on the form cannot be selected – the easiest way to select the form itself is to click on the form's blue title bar.
Upon selecting "Tab Order", the TabIndexes for each control will appear in little boxes next to each control on your form:
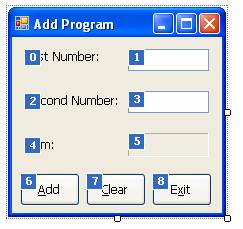
The numbers in these TabIndex "boxes" are editable, so you can adjust your TabIndexes that way. You edit the boxes simply by clicking on them in the desired order. To turn off the display, press the Esc key.
Note on naming conventions for controls:
Note that in this sample program, the textbox names are prefixed with "txt", the label with "lbl", and the buttons with "btn". These follow the standard naming conventions for controls. For controls that will not be referred to in code (such as the three descriptive labels), its OK to leave them with the VB default names ("Label1", "Label2", etc.) – but for controls that will be referenced in code, it is highly recommended that they be renamed to conform to the naming conventions.
Following is a table listing some commonly used controls and their recommended prefixes:
|
Control type |
prefix |
Example |
|
Button (Command Button) |
btn (or "cmd") |
btnExit |
|
Check box |
chk |
chkReadOnly |
|
Combo box |
cbo |
cboEnglish |
|
Dialogs |
dlg |
dlgFileOpen |
|
Date picker |
dtp |
dtpPublished |
|
Form |
frm |
frmEntry |
|
Groupbox (Frame) |
Gbx (or "fra") |
gbxLanguage |
|
Grids |
grd |
grdPrices |
|
Horizontal scroll bar |
hsb |
hsbVolume |
|
Image |
img |
imgIcon |
|
ImageList |
iml |
imlAllIcons |
|
Label |
lbl |
lblHelpMessage |
|
List box |
lst |
lstPolicyCodes |
|
ListView |
lvw |
lvwHeadings |
|
Menu |
mnu |
mnuFileOpen |
|
Month view |
mvw |
mvwPeriod |
|
Tab control |
tab |
tabFirst |
|
Picture box |
pic |
picVGA |
|
ProgressBar |
prg |
prgLoadFile |
|
Radio Button (Option Button) |
rad (or "opt") |
radGender |
|
RichTextBox |
rtb |
rtbReport |
|
StatusBar |
sbr |
sbrDateTime |
|
Text box |
txt |
txtLastName |
|
Timer |
tmr |
tmrAlarm |
|
Toolbar |
tbr |
tbrActions |
|
TreeView |
tvw |
tvwOrganization |
|
UpDown |
upd |
updDirection |
|
Vertical scroll bar |
vsb |
vsbRate |
4. Double-click the Add button. This causes the code window to open for the event–handler Sub that will handle the Click event for the Add button. The code you place in this Sub will run when the user clicks the Add button.
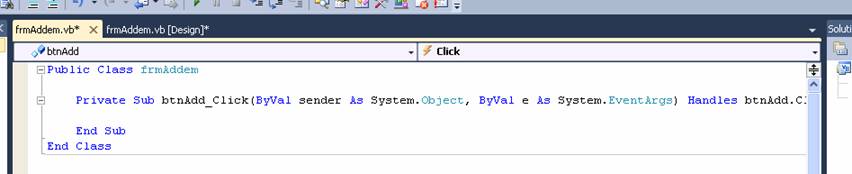
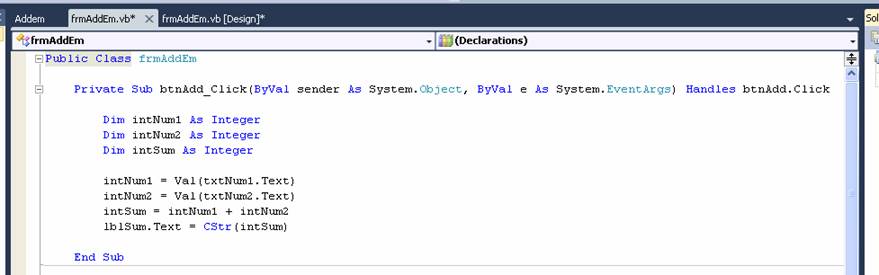
Type the following code in the btnAdd_Click routine:
Dim intNum1 As Integer
Dim intNum2 As Integer
Dim intSum As Integer
intNum1 = Val(txtNum1.Text)
intNum2 = Val(txtNum2.Text)
intSum = intNum1 + intNum2
lblSum.Text = CStr(intSum)
Your code window should now look similar to the following:
In this code, a number of things should be pointed out. First, in the statements
intNum1 = Val(txtNum1.Text)
intNum2 = Val(txtNum2.Text)
the syntax txtNum1.Text and txtNum2.Text refer to the Text property of the textboxes txtNum1 and txtNum2 respectively. In general, to refer to a property of a control in code, use "dot" notation, in the format object.property.
The Text property of a textbox is considered to be a String data type. Whatever the user types into a textbox will be stored in its Text property. The Val function converts a string to a number. Basically, these statements are saying "convert the contents of the textboxes to numbers and store them in the Integer variables".
The statement
lblSum.Text = CStr(intSum)
converts the value of intSum from an Integer to a String data type; the string representation is stored in the Text property of the lblSum label control (the label with the border). This assignment statement causes the sum to be displayed on the form in the lblSum control.
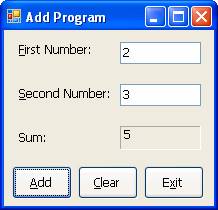
5. We're not done yet, but we can run the program to test the add function. To run the program, do one of the following three things: (1) click the Run button on the toolbar (looks like a sideways triangle, to the left of the "Debug" drop-down), (2) press F5, or (3) select Debug, then Start Debugging from the IDE menu. The form should then become the active window. Type 2 for the first number and 3 for the second, then click the Add button. The result should be displayed in the designated label, as shown below:
You can go back and enter different numbers and click the Add button again. Also, test the access keys. Observe what happens when you press Alt+F, Alt+S, and Alt+A.
If you click the Clear or the Exit button, nothing will happen, because we did not yet write code to respond to the Click events for those buttons (we will fix this shortly).
6. Stop the program. This can be done by clicking the "X" button on the upper-right-hand corner of the form, by clicking the stop button on the IDE toolbar (looks like a black square), or by selecting Debug, then Stop Debugging from the IDE menu. Once we finish coding, we will be able to stop the program by clicking the Exit button on our form.
7. We are now back in the "design-time" environment. Make sure you understand the difference between "design-time" and "run-time". Double-click the Clear button, and type the code indicated below in the btnClear_Click event procedure.
Private Sub btnClear_Click(ByVal sender As System.Object, ByVal e As System.EventArgs) Handles btnClear.Click
txtNum1.Text = ""
txtNum2.Text = ""
lblSum.Text = ""
txtNum1.Focus()
End Sub
The first three statements in this procedure clear the text out of the two textboxes and the "sum" label by assigning the "empty string" to their Text properties – the "empty string" ("") is simply two quotes next to each other with nothing in between. Visually, the text in these controls will disappear when these assignment statements are made.
The last statement, txtNum1.Focus causes the cursor to be positioned on the txtNum1 textbox. "Focus" is a method of the textbox. Methods of objects generally perform some action on the object. Focus causes the control in question to be the "active" control. The general format for invoking a method on an object is object.method.
8. Double-click the Exit button to open the code window for the btnExit_Click event. Type Me.Close after the procedure header. ("Me" refers to the form, and Close is a method of the form. We are telling the form to close itself here.) This ends the program, as a Windows Forms program ends when all of its forms have been closed.
Private Sub btnExit_Click(ByVal sender As System.Object, ByVal e As System.EventArgs) Handles btnExit.Click
Me.Close
End Sub
9. Run the program again. The Clear and Exit buttons should now work. When you are done testing the program, exit it to return to the design-time environment.
Enhancements
At this point, the basic functionality of the program is complete, although there are a handful of enhancements that can be made. These enhancements are described below. As each enhancement is discussed, add it to your program and test it.
One enhancement is to highlight the text in a textbox when that textbox receives focus. To do this, code the GotFocus event for that textbox:
Private Sub txtNum1_GotFocus(ByVal sender As Object, ByVal e As System.EventArgs) Handles txtNum1.GotFocus
txtNum1.SelectAll()
End Sub
The above code uses the textbox's SelectAll method to select all the text in the textbox.
The GotFocus event for txtNum2 should be coded in the same manner:
Private Sub txtNum2_GotFocus(ByVal sender As Object, ByVal e As System.EventArgs) Handles txtNum2.GotFocus
txtNum2.SelectAll()
End Sub
Alternate Method of Selecting Text in a TextBox:
An alternative way to select (highlight) text in a textbox (either all the text or a portion of it) is to use the SelectionStart and SelectionLength properties. These properties are only available through code; they are not available the Properties window. The SelectionStart property specifies on which character position of the text the highlighting should begin (it is zero-based, so 0 means the first character). TheSelectionLength property specifies how many characters of the text should be highlighted. In the example below, we are using the Len function on the text in the textbox to set the SelectionLength property to the total number of characters contained in the text. Thus, the two statements below have the effect as txtNum1.SelectAll():
txtNum1.SelectionStart = 0
txtNum1.SelectionLength = Len(txtNum1.Text)
A second enhancement would be to weed out non-numeric characters as the user types in the textbox. To do this, you would code a KeyPress event for that textbox, as shown below:
Private Sub txtNum1_KeyPress(ByVal sender As Object, ByVal e As System.Windows.Forms.KeyPressEventArgs) Handles txtNum1.KeyPress
e.Handled = Not (Char.IsDigit(e.KeyChar) Or Asc(e.KeyChar) < 32)
End Sub
In the code above, you'll notice that while there is only one line of code, quite a bit of processing occurs in that line. The overall effect is that if the user types in a numeric digit (i.e., "0" through "9"), the key is accepted and will appear in the textbox. Also, if the user presses the "backspace" key or a "navigation" key (such as left arrow or right arrow), those keys will also be accepted. Any other key (such as the letter "A") will not be accepted – it will appear to the user that it is a "dead" key (i.e., they press the key on the keyboard but there is no response; the character that was typed does not appear in the textbox). How this is accomplished is explained as follows:
Note from the Sub header that the argument e As System.Windows.Forms.KeyPressEventArgs is passed to the KeyPress event procedure. Within the procedure, we can use the variable "e" to access the properties of these KeyPress event arguments (KeyPressEventArgs). One important property is KeyChar, which represents the keyboard key that was pressed. The datatype KeyChar is character ("Char"); and a method which can be used on character datatypes is IsDigit, which returns a True/False value indicating whether or not that character is in the range "0" through "9".
The part of the code that says
Char.IsDigit(e.KeyChar)
will return a True or False value depending on whether the user typed a key in the range "0" through "9".
The condition described above is joined with an Or with the following condition:
Asc(e.KeyChar) < 32
Here, the Asc function will determine the ASCII value of e.KeyChar and see if it is less than 32. ASCII characters in the range 0 to 31 are generally referred to as "control characters", which are a range of unprintable characters that represent keystrokes such as backspace, navigational arrow keys, carriage return, form feed, and the like. If the user presses any of these naviagational keys, we want to let them do so.
In the statement, we reverse the True/False value of the two conditions joined by the Or by placing Not in front of it. The expression on the right-hand side of the equal sign in the assignment statement is:
Not (Char.IsDigit(e.KeyChar) Or Asc(e.KeyChar) < 32)
So – if it IS a key we want, this condition will return False, if it is a "bad" key (like the letter "A"), this condition will return True. Why do we do this, you may ask ...
The Boolean True/False value of this condition is assigned to the Handled property of the KeyPressEventArgs variable e. Recall that the complete statement is:
e.Handled = Not (Char.IsDigit(e.KeyChar) Or Asc(e.KeyChar) < 32)
The Handled property is a Boolean value that you can set in the KeyPress event to determine whether the key that is passed to it gets thrown away or gets passed on to the textbox. If the Handled property is set to True, we are effectively saying "OK, I've looked at this key and determined that it is not acceptable – I have "handled" it in this event, and I am not passing it on to the textbox" (therefore, setting Handled to True throws the key away). If the Handled property is set to False (or not set at all), then we are effectively saying that we did not need to "handle" it, and it gets passed on to the textbox. It might have been clearer if this property was called "KeyBlocked" or something like that, but Microsoft gave us "Handled", so that is what we must deal with.
The KeyPress event for txtNum2 should be coded in the same manner:
Private Sub txtNum2_KeyPress(ByVal sender As Object, ByVal e As System.Windows.Forms.KeyPressEventArgs) Handles txtNum2.KeyPress
e.Handled = Not (Char.IsDigit(e.KeyChar) Or Asc(e.KeyChar) < 32)
End Sub
If you want to limit the number of digits the user types into a textbox, you can set the MaxLength property of the textbox. By default, the MaxLength property of a textbox is 32767 (the maximum number of characters that can be entered in a standard textbox). In our program, we set the MaxLength property of txtNum1 and txtNum2 each to 4.
The final enhancement discussed here is the implementation of an "auto-tab" feature. This is a feature where, when the user types in the maximum number of characters in a control, they are automatically tabbed to the next available control. Textboxes do not have an auto-tab property, but one can be implemented by setting the MaxLength property and then coding the TextChanged event for that textbox, The code for the TextChanged event tests to see if the length of the text currently in the box is equal to the MaxLength, and if so, focus is given to the next control in the tabbing sequence. For example, you code the TextChanged event for txtNum1 and txtNum2 as follows:
Private Sub txtNum1_TextChanged(ByVal sender As System.Object, ByVal e As System.EventArgs) Handles txtNum1.TextChanged
If Len(txtNum1.Text) = txtNum1.MaxLength Then
txtNum2.Focus()
End If
End Sub
Private Sub txtNum2_TextChanged(ByVal sender As System.Object, ByVal e As System.EventArgs) Handles txtNum2.TextChanged
If Len(txtNum2.Text) = txtNum2.MaxLength Then
btnAdd.Focus()
End If
End Sub
Download the VB.NET project code for the example above here.
The subsequent topics in this section are a series of "programming exercises", where you can combine the language basics you have learned in the previous chapters along with the GUI concepts presented in this topic to solve some simple and some not-so-simple programming tasks.