More on Forms
Form Properties
There a number of properties of forms that affects their appearance and behavior. A handful of these properties are discussed below:
|
Property |
Description |
|
StartPosition |
Determines the position of a form when it first appears. To center a form on the screen, set this property to CenterScreen. |
|
Text |
Specifies the text that will appear in the title bar of the form. |
|
Font |
Sets the font that will be used by default for any controls placed on the form. You can override the font for any individual control by setting that control's Font property. |
|
AutoScaleMode |
By default, the setting of this property is Font, which causes the form to resize if the Font property is changed. If this behavior is not what you want, set the value of this property to None. |
|
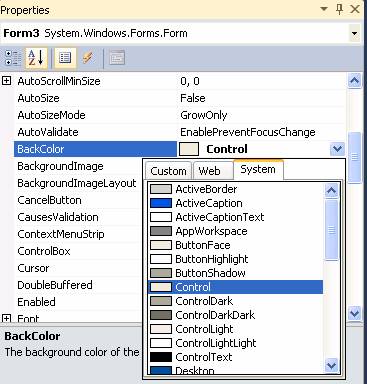
BackColor |
Sets the background color of the form. When you click the down arrow, you are presented with three tabs of color selections ("Custom", "Web", and "System"). By default, the form's BackColor is set to "Control" from the "System" tab:
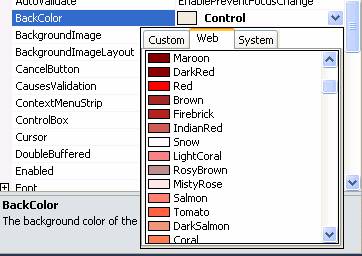
The "Web" tab provides a nice variety of colors to choose from:
Note: To set the value of the BackColor in code, use the following syntax to set the BackColor to a "Web" color: Me.BackColor = Color.Red
Use the following syntax to set the BackColor to a "System" color: Me.BackColor = Color.FromKnownColor(KnownColor.Control)
|
|
FormBorderStyle |
By default, the value of this property is Sizable, meaning the user can resize the form at run-time. Generally, you will either leave this as is, or set the value to one of the "fixed" options (such as FixedSingle), meaning the user cannot resize the form at run-time. If you set this property to None, the form will have neither a border nor a title bar (the "None" option is generally only suitable for a splash screen). |
|
TopMost |
If set to True, forces a form to be displayed on top of all others if multiple forms are displayed. |
The Show, ShowDialog, Hide, and Close Methods
The Show method of a form displays that form on the screen. If the form to be shown is not already loaded into memory, the Show method will load it before showing it. The Show method is typically used to transfer control from one form to another. The syntax is:
formname.Show
For example, if I am in Form1 and I want to display Form2, the syntax would be:
Form2.Show
When you display one form from another, you may want the user to complete work on that form before returning to the first one. This does not happen automatically. By default, VB will display the second form and then continue executing code from the first form. To suspend execution of the first form until after the second form is done with, use the ShowDialog method rather than the Show method. The syntax is:
Form2.ShowDialog
The Hide method of a form removes the form from the screen (makes it invisible), but the form still remains in memory. The syntax is:
formname.Hide
To refer to the form in which code is currently running (i.e. the "current" form, or the "active" form), you can optionally refer to the form by using the keyword Me:
Me.Hide
Or, any time you want to execute a method of the form on itself, you can simply code the method name, omitting the keyword "Me.":
Hide
The Close method of a form removes the form from memory and releases all its resources. The syntax is:
formname.Close
To close the current form, you can use:
Me.Close
- or –
Close
The Load, Shown, and FormClosing Events
In the Load event, you would typically perform initialization-type tasks. However, an action that should not be performed in the Load event is to set focus to a particular control on the form, due to the fact that the form is fully loaded and controls initialized only after the Load event completes.
Private Sub Form1_Load(ByVal sender As Object, ByVal e As System.EventArgs) Handles Me.Load
' other initialization stuff
TextBox1.Focus ' focus will not necessarily go to TextBox1
End Sub
To remedy this problem, you can use one of the Shown event, which fires when the form is first shown, following the Load event. Placing the code to set focus to a control will work in the Shown event:
Private Sub Form1_Shown(ByVal sender As Object, ByVal e As System.EventArgs) Handles Me.Shown
' other statements
TextBox1.Focus ' no problem here
End Sub
When a form is closed (via the Close method or when the user clicks the Windows "close" button ("X") on the form), the FormClosing event is fired. If you write code in the FormClosing event, that code will execute before the form is closed. One thing you may want to do there is ask the user to confirm that they want to quit. If they have a change of heart and say "no", you can cancel the closing of the form by setting e.Cancel = True:
Private Sub Form1_FormClosing(ByVal sender As Object, _
ByVal e As System.Windows.Forms.FormClosingEventArgs) Handles Me.FormClosing
If MsgBox("Are you sure you want to quit?", _
MsgBoxStyle.Question + MsgBoxStyle.YesNo, _
"Exit") = DialogResult.No Then
e.Cancel = True
End If
End Sub
Multi-Form Projects
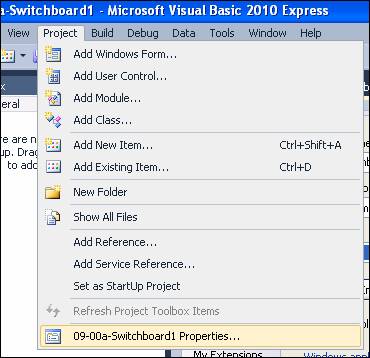
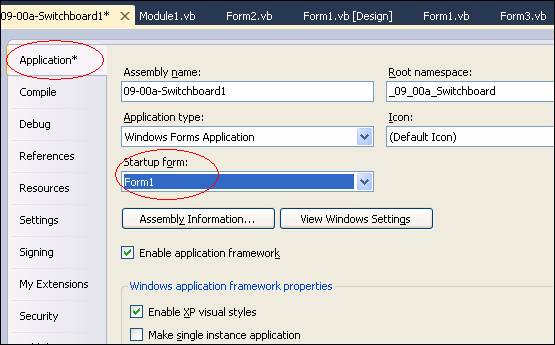
Many projects will use more than one form. When you have more than one form in a project, you must specify a "Startup Form", which is done via the Project menu, Properties item. The startup form tells VB which form is to have its code run first. By default, the startup object is the initial form that is supplied with every new VB Project.
The screen-shot below shows the selection of the "ProjectName Properties" item from the Project menu:
On the resulting Properties screen, the Startup form selection is located on the Application tab:
Here are a couple of scenarios for projects with multiple forms:
(1) You have an application that performs a variety of functions, requiring multiple "screens" (forms). You can use one form as a "switchboard" or "main menu" form that connects to the other forms.
(2) You may wish to have a "splash screen" start off your application before the main form is displayed.
Using Multiple Forms: "Switchboard" Examples
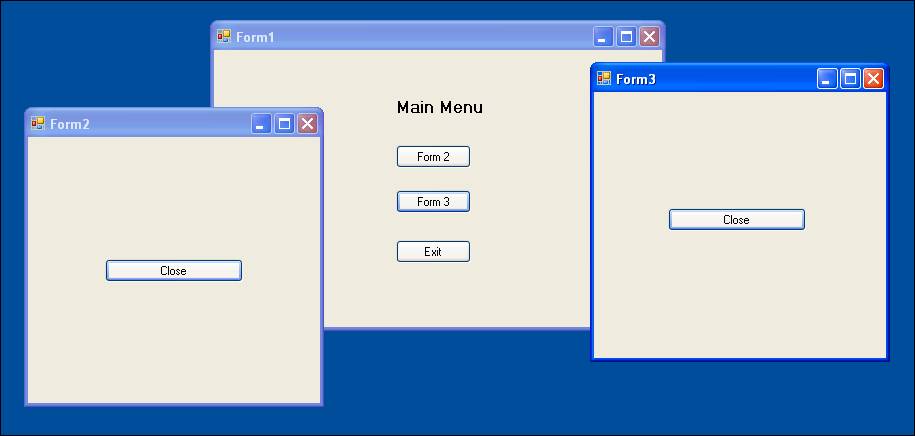
Assume you have a project with three forms: Form1, Form2, and Form3.
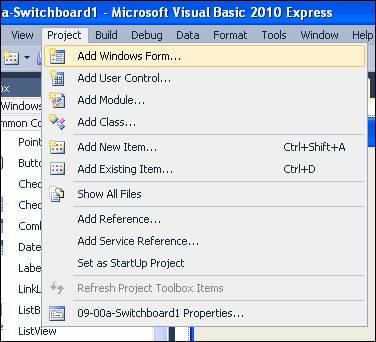
Note: To add a form to a project, go to the Project menu and select Add Windows Form:
Form1 serves as the switchboard form, which contains three command buttons: btnForm1, btnForm2, and btnExit:
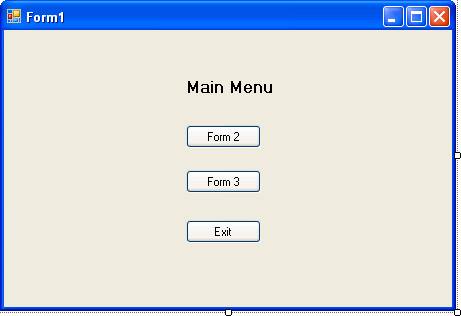
Version 1:
The code behind these buttons is:
Private Sub btnForm2_Click(ByVal sender As System.Object, ByVal e As System.EventArgs) Handles btnForm2.Click
Form2.Show()
Me.Hide()
End Sub
Private Sub btnForm3_Click(ByVal sender As System.Object, ByVal e As System.EventArgs) Handles btnForm3.Click
Form3.Show()
Me.Hide()
End Sub
Private Sub btnExit_Click(ByVal sender As System.Object, ByVal e As System.EventArgs) Handles btnExit.Click
Me.Close()
End Sub
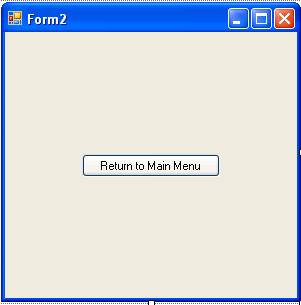
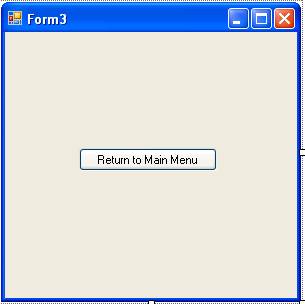
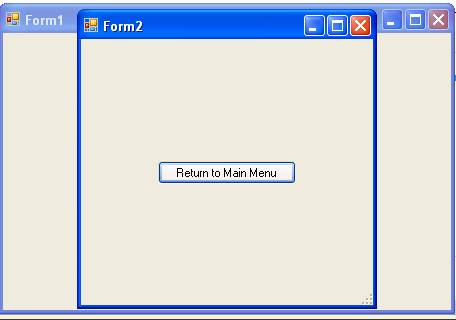
Form2 and Form3 simply contain one button with the text "Return to Main Menu".
The code behind the button on each of these forms is:
Form1.Show()
Me.Close()
The way it works is as follows:
When you click "Form 2" on the Main Menu, Form2 will appear and the Main Menu form will be hidden.
When you click "Return to Main Menu" on Form2, the Main Menu will show and Form2 will close.
When you click "Form 3" on the Main Menu, Form3 will appear and the Main Menu form will be hidden.
When you click "Return to Main Menu" on Form3, the Main Menu will show and Form3 will close.
When you click "Exit" on the Main Menu, a confirmation message will appear asking if you are sure you want to quit (the FormClosing event of Form1 contains the code below).
Private Sub Form1_FormClosing(ByVal sender As Object, _
ByVal e As System.Windows.Forms.FormClosingEventArgs) Handles Me.FormClosing
If MsgBox("Are you sure you want to quit?", _
MsgBoxStyle.Question + MsgBoxStyle.YesNo, _
"Exit") = DialogResult.No Then
e.Cancel = True
End If
End Sub
Download the VB project code for the example above here.
Version 2:
In the second version, when you click "Form 2" or "Form 3" off of the Main Menu (Form1), Form2 or Form3 will appear on top of the Main Menu (the Main Menu will not be hidden). However, you will not be able to interact with the Main Menu when Form2 or Form3 is open, because the code is displaying Form2 and Form3 with the ShowDialog method.
The button code for Form1 in this case is:
Private Sub btnForm2_Click(ByVal sender As System.Object, ByVal e As System.EventArgs) Handles btnForm2.Click
Form2.ShowDialog()
End Sub
Private Sub btnForm3_Click(ByVal sender As System.Object, ByVal e As System.EventArgs) Handles btnForm3.Click
Form3.ShowDialog()
End Sub
Private Sub btnExit_Click(ByVal sender As System.Object, ByVal e As System.EventArgs) Handles btnExit.Click
Me.Close()
End Sub
And the code behind the "Return to Main Menu" button on Form2 and Form3 is simply:
Me.Close()
Download the VB project code for this example above here.
Version 3:
In the third version, the TopMost property of Form2 and Form2 have been set to True, and they are being displayed from the Main Menu with the Show method (not ShowDialog). The effect of this is that Form2 and Form3 can be open at the same time, and the Main Menu is also accessible. (In this example, the text on the Form2 and Form3 buttons has been changed to "Close".)
The button code for Form1 in this case is:
Private Sub btnForm2_Click(ByVal sender As System.Object, ByVal e As System.EventArgs) Handles btnForm2.Click
Form2.Show()
End Sub
Private Sub btnForm3_Click(ByVal sender As System.Object, ByVal e As System.EventArgs) Handles btnForm3.Click
Form3.Show()
End Sub
Private Sub btnExit_Click(ByVal sender As System.Object, ByVal e As System.EventArgs) Handles btnExit.Click
Me.Close()
End Sub
And the code behind the "Close" button on Form2 and Form3 is simply:
Me.Close()
Also, the FormClosing event for Form1 has been modified as follows:
Private Sub Form1_FormClosing(ByVal sender As Object, _
ByVal e As System.Windows.Forms.FormClosingEventArgs) Handles Me.FormClosing
If MessageBox.Show("Are you sure you want to quit?", _
"Exit", _
MessageBoxButtons.YesNo, _
MessageBoxIcon.Question, _
MessageBoxDefaultButton.Button2, _
MessageBoxOptions.DefaultDesktopOnly) = DialogResult.No Then
e.Cancel = True
Exit Sub
End If
If IsFormOpen("Form2") Then
Form2.Close()
End If
If IsFormOpen("Form3") Then
Form3.Close()
End If
End Sub
In the code above, the MessageBox class is used as opposed to the MsgBox function used in the previous examples, because we need to use the "DefaultDesktopOnly" option. The "DefaultDesktopOnly" option will cause the message box to appear above all other forms, even those with TopMost set to True. Without this option, the message box would appear behind Form2 or Form3 if they were open, possibly obscuring all or part of the message box that you need to interact with.
The code above also tests whether or not Form2 and Form3 are open when you are closing Form1. If so, those forms will be closed before Form1. The function to test whether a form is open is coded as follows:
Private Function IsFormOpen(ByVal pstrFormName As String)
For Each objForm In My.Application.OpenForms
If objForm.Name <> pstrFormName Then
Return True
End If
Next objForm
Return False
End Function
Download the VB project code for this example above here.
Splash Screen
The idea behind the splash screen example is to introduce the user to the application by showing a form with perhaps a logo or colorful graphic. The splash screen should display for a few seconds and then automatically switch to the application's main screen with no intervention from the user.
The following steps demonstrate how to implement a splash screen.
Open a new project, and name the default form frmSplash.
Set the FormBorderStyle to None.
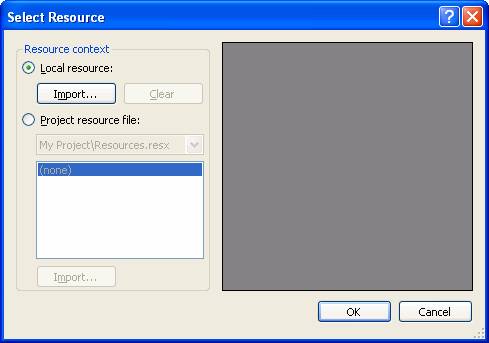
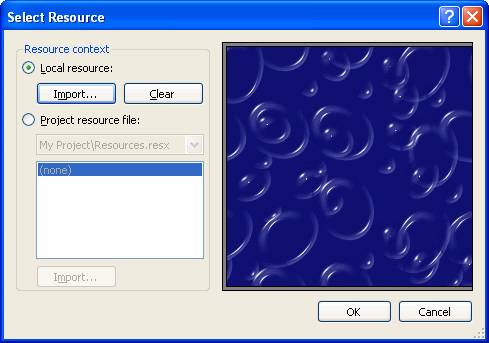
Set the BackgroundImage: When you click the ellipsis button on the BackgroundImage property, a dialog box will open to allow you to navigate your system to find a suitable picture file. First, the "Select Resource" dialog box will appear. Make sure that the "Local resource" radio button is checked, and click the Import button:
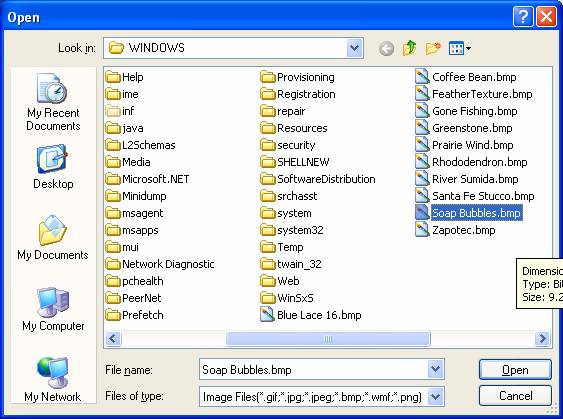
An "Open" dialog box will then appear. From there, you can navigate your system to find a suitable image. In the case of this example, the file "Soap Bubbles.bmp" was selected from the WINDOWS folder:
Click the "Open" button. The "Select Resource" dialog will then show the image as a preview. If you are satisfied with the selection, click "OK".
The background image should now show on your splash screen form.
Add a Label control to the form, and set its BackColor property to Transparent, the Font property to Arial 24 point Bold, and the ForeColor property to White (or whatever color looks good against the image background), and the Text property to My Cool Application. The form should look something like this:

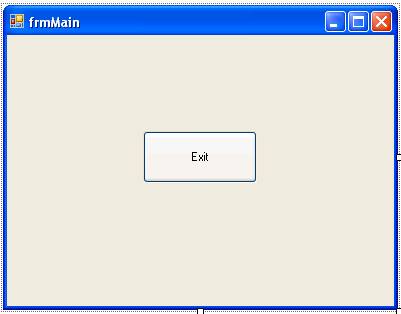
Go to the Project menu and select Add Windows Form, and name the new form frmMain. Add a button to the form named btnExit with the text Exit. Behind the click event for the button, put the code Me.Close.
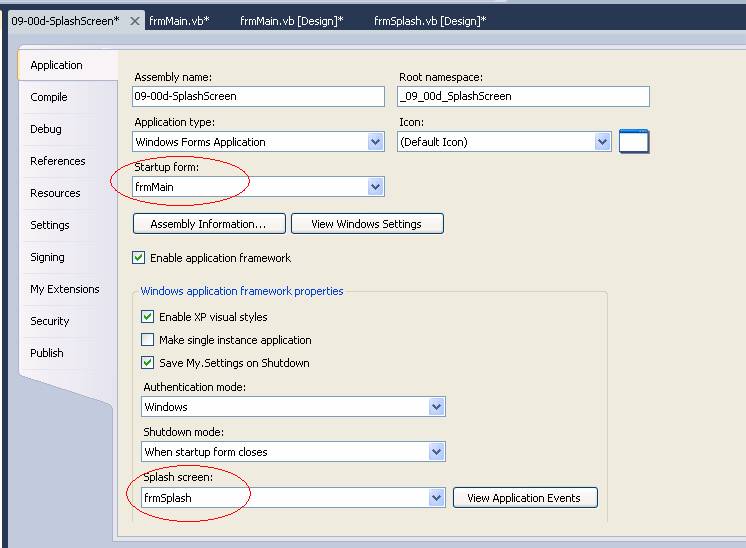
Go to the Project menu and select the Properties item. On the Application tab of the Properties screen, set "Startup form" to frmMain, and set "Splash screen" to frmSplash:
Run the program. The splash screen should display for a few seconds and then automatically switch to the main screen.
Download the VB project code for this example above here.
Disabling the Form Close ("X") Button
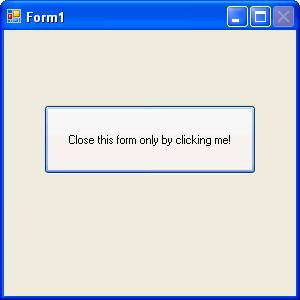
There may be times when you want to disallow the user from closing a form with the "X" button on the title bar, forcing them to close the form only by clicking on a button you provide, as illustrated in the screen shot below:
This can be accomplished by adding the following code to your form:
Protected Overrides ReadOnly Property CreateParams() As CreateParams
Get
Dim cp As CreateParams = MyBase.CreateParams
Const CS_DBLCLKS As Int32 = &H8
Const CS_NOCLOSE As Int32 = &H200
cp.ClassStyle = CS_DBLCLKS Or CS_NOCLOSE
Return cp
End Get
End Property
Download the VB project code for this example above here.